Thursday, June 23, 2016

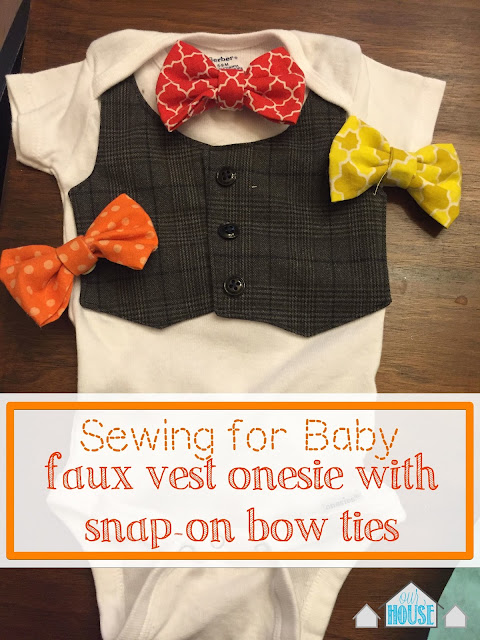
Sewing for Baby: Faux Vest Onesie with Snap On Bow Ties


So I know my last post was a Sewing for Baby post but this post was all ready to go so I thought I would share it now.  Since I have a daughter all of the baby clothing that I have sewn has been for girls but when this cute vest onesie with bow ties showed up in my Pinterest feed I knew I had to make it for someone.  Conveniently my friend's son Jack got baptized a few weekends ago and I thought this onesie would make a great gift.

The tutorial is from the blog Make It & Love It and you can find it here.  There are also tutorials for bow tie onesies with suspenders and another one with a cardigan.  They are all so cute and they are very simple to make.

The tutorial doesn't provide a pattern since onesies vary so much so I started by drawing my pattern on some tracing paper.
Then I put the vest pieces together following the tutorial.  I found this suiting material at Joann Fabrics.
Next I attached the vest pieces.
I finished the vest by sewing on 3 buttons.  I attached cut out a little circle of fusible fleece and ironed it the inside of the onesie just below the collar of the shirt and then attached a Kam snap.

I made the bow ties with fabric quarters that I picked out at Joanns.  I used the tutorial that was attached to the faux vest onesie tutorial to assemble them.
I think it is such a fun project and I am sure Jack will look very dapper wearing it!

Monday, June 20, 2016

Sewing for Baby: Tula Corner Drool Pads

Ahh summer...my favorite time of year.  It has been so nice to be off from work of course but it has been even nicer to have adventures with my little Lyla.  One thing that makes having adventures with a baby even more fun is my Tula soft structure carrier.  Last time I posted in the Sewing for Baby series, I shared the hood that I made for my Tula which you can read about here.  Carry Ella Creative made that pattern and also the pattern for these drool pads which you can find here.

Just like the hoodie hood pattern, the directions for this pattern are so well written.  I was able to bust out this project in one nap session (2 hours, which is longer than her naps lately but she had skipped her morning nap that day).  The only thing that I did different from the directions was use terry cloth for the absorbent layer instead of heavyweight flannel because I had the terry cloth on hand.  It was a little bit more difficult to sew through all the layers using the terry cloth because it was so thick.  It worked out fine though, it just gave my sewing machine a little bit of a workout.


The drool pads got immediate use after I made them when I wore my daughter in a back carry while my choir sang at a baseball game.  She definitely enjoyed chewing on them as they were soaking wet afterward!

I have been busy with many projects as usual and I actually have another sewing for baby project ready to post but this one is for a baby boy!  I can't wait to share that fun project with you.  Here is a look at the other projects in the Sewing for Baby series:

Tuesday, June 14, 2016

More Updates in the Bonus Room

When I last posted about this room it looked like this:

And here is a reminder of how it looked before:

After the workers were done with their part of the redo it was our turn to start on our work.  First off we selected some baseboards at Home Depot and my husband took on the task of installing them. There are still a few left to install but we are waiting until we get a new door for the closet first.  Then it was time for paint.  I didn't mind the paint color in this room which is also in the hallway upstairs but for some reason it looked pink under the lights in this room.  It was even more noticeable in person than in the above photos.  We had to paint anyway since the bottom 3rd of the walls were removed and then replaced because of the drain tile installation.  The color we selected is Behr Windrush.  It is a lovely greige that looks different in different lights and at different times of day.


We purchased a new futon because the frame of my futon that I purchased in college was shot.  I think it had been taken apart and reassembled too many times with many moves over the years.  We purchased the Emily Futon in gray linen from Target.  I like this futon because it has a nice modern look and it isn't as bulky as my old futon.  It is also so simple to change it from a bed to sofa.  My other futon required two people to switch it back and forth but this one is easy to do all by myself.

I also purchased this 5' by 7' area rug at Target.  I wanted a soft surface for Lyla to play on in the room.  


This room still needs a lot of things:

1. finish installing baseboards, fill nail holes, caulk, and paint
2. install closet door (the current door wouldn't close)
3. paint trim around the closet door
4. curtain rods and curtains
5. media furniture for the TV
6. toy storage
7. pillows and a throw for the futon
8. wall decor

I hope to have the room mostly finished by the end of the summer.  Wish me luck!


Related Posts Plugin for WordPress, Blogger...