Wednesday, May 4, 2016

Gift Card College Survival Kit Grad Gift


Hello Everyone!  Happy May!  I am back today with a very belated blog post.  Last year my brother graduated from high school and I made him a fun gift that I wanted to share on the blog. For some reason the photos of this project disappeared from my iPhoto so I was unable to.  About a month ago when I opened my iPhoto it had a message that it needed to reconfigure itself and after it was done these photos had magically reappeared!  So now I get to share it with you almost a year later than planned but it is perfect timing for anyone who needs some grad gift ideas for this year.
I wanted to come up with a unique idea for my brother's graduation gift and when I saw a gift card book and then another idea about a college survival kit with gift cards on Pinterest I decided to combine the two.  My brother is attending the University of Kansas so I purchased gift cards that he could use in Lawrence.
Then I cut some paper I had on hand to make the book part.  I purchased scrapbooking paper in black and gold colors for the decorations in the book.  I used my Silhouette Portrait and printable gold foil for all the sentiments in the book.
I got him a Starbucks gift card to help him stay awake while studying.
I got him an iTunes gift card to keep him pumped while studying and a Wendy's gift card to help with the hunger during an all night study session.
I got him a movie gift card for when he needed to take a break from studying (which he used to see the latest Star Wars movie, good choice!) and a Walgreens gift card for stuff when he was feeling a little under the weather.
I got him a Target gift card for any other essentials he needed and a KU book store gift card for school spirit items.  I made all of the gift card pockets with black card stock and my Silhouette Portrait.  I loved the way it turned out!  What do you think?

Wednesday, April 20, 2016

Nursing Cover

So I have been kind of terrible at blogging lately but that is okay because this blog is just for fun!  I have not been terrible at completing projects though and eventually I will share them all on here.

Today I am sharing an easy sewing project: a nursing cover.  The hardest part of having a child for me has been breastfeeding.  You would think that since it is the natural way to feed a child that it would come easily for everyone but it hasn't for me or many of my friends.  Thank goodness for lactation consultants!  The first 6 weeks with my daughter was so hard because I wasn't producing enough milk so I had to feed her + supplement with formula + pump at almost every feeding. Newborns eat 8-12 times a day so that was a lot of extra work!  Basically I would get done with one feeding cycle and then have 30 minutes to an hour until it all started again.  I almost gave up several times but it worked in the end.  There are still bumps in the road but I am proud to say that I have made it almost 9 months and my goal is 1 year!

Some women are very comfortable nursing in public without a cover and I admire them.  I am too shy for that though so a cover is essential for me.  And my daughter is at the age where she is a distracted eater so sometimes I even use one when I am at home just to get her to focus on eating.  I bought some adorable scarves on Etsy that could be used as nursing covers but they just didn't work for me because I couldn't see her and she often needed help latching in the beginning.  I found that a nursing cover with a stiff piece at top was the way to go like one I have called the Udder Cover (seriously what is up with that product name...great product, terrible product name).  It never occurred to me that I would be able to easily make one myself until I saw this tutorial and this tutorial.

I mostly followed the first tutorial but I used the second to help with the boning step because I was having trouble with that step on the first one.  I think it was my brain not working that day because I think both tutorials are good.


The project only required a yard of fabric, coordinating thread, corset boning, and d rings so it was a cheap sew too.  I got enough boning to make a ton more.  One thing that I would change is the part with the boning sags a little and when I looked at my Udder Cover I noticed that the straps were overlapping with the edge of the boning instead of being right at the ends of the boning.  I think making that minor change would help the boning to be supported a little bit more.

I have been at the sewing machine for most of my projects lately but my husband has been working on a project for the nursery that I hope to have finished soon and soon *fingers crossed* our bonus room will be getting a big makeover.  The work was supposed to start at the beginning of April but contractors are always on their own time.  I can't wait to be able to use that room again!

Monday, March 28, 2016

Sewing for Baby: Boppy Cover

It would seem that every break I have from school I am sick.  This nice long Easter break is no exception.  I have a terrible cold and pink eye in both eyes.  Oh the joys.  So since I don't feel like doing much else I thought I would write a blog post on a project I completed quite a while ago now. This project started with the purchase of some fabric that I had to have but had no clue what I was going to do with it when I bought it.  I got the idea of making a cover for my boppy nursing pillow (I don't use it for nursing anymore but it is great for other uses with baby like propping and sitting assistance).  I found this tutorial from the blog Vanilla Joy (remember the pattern weights from the last post).  I didn't have quite enough fabric for both sides of the cover so I decided to do the other side with this embossed minky from Fabric.com:
The tutorial has link to a free pattern and it was pretty easy to make.  The only difficult part was trying to sew a zipper with minky.  I am not so great at zipper sewing as it is and minky is a really tough fabric to use with zippers because it is fluffy and slippery.


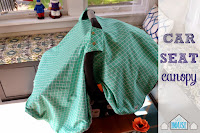
It was worth it though because it is so cute!  I have a few bonus pictures with today's post.  One of my best friends (who I co-hosted this baby shower for) had a baby boy this past Wednesday.  She made his nursery have a woodland/mountain theme and even painted a mountain scene behind his crib which turned out awesome!  I decided to sew a few items for her and the baby so here is a look at what I made.  You can find the links to make all of the items as well as links on how to make the leggings and scarf bib that are pictured on my daughter at the bottom of this post.


And here is a look at the one of the changing pad covers in the nursery.  Gotta love Snapchat!
The cotton prints on the changing pad covers are from Spoonflower.   All of the rest of the cotton prints are from Joann Fabrics.  All of the minky fabric is from Fabric.com except the grey dot minky on the mountain changing pad cover.  That one is from Joann Fabrics.  The snuggle flannel prints for the cloth wipes are all from Joann Fabrics.  The snaps on the car seat canopy are from Kam Snaps.

Monday, March 21, 2016

Pattern Weights

Usually I don't write a post that only contains 2 pictures but tonight I am.  I just wanted to throw out a quick idea for all you sewists out there.  I'm sure that there are things that most people who sew detest doing for each project.  For many it might be ironing but most of the time I kind of like it as long as it isn't a large project like curtain panels.  The biggest thing that annoys me is pinning pattern pieces to fabric.  That is probably one reason why I avoided sewing projects with patterns for a long time.

About a month ago I found some hot air balloon flannel fabric while picking up some flannel to make cloth wipes for a friend.  It was one of those times where I saw the fabric and had to have it but I had no clue how to use.  After some thought I decided that making a boppy cover with it would be the perfect application (post coming soon!).  I found a tutorial that I liked and in one of the tutorials pictures I saw the cute pattern weights that the blogger had made and of course she linked them to that post.  I had pinned how to make some diy pattern weights awhile ago but these were so much easier so I knew I had to make some right away.  Here is the tutorial from the blog Vanilla Joy.
You can read the full tutorial on that blog but they are so easy to make.  You just glue a couple of washers together with hot glue and then wrap them with strips of fabric scraps to add a little color to them.  And then you plop them on top of pattern pieces and use a rotary cutter and mat to cut out the fabric.  It is so much easier than pinning and using fabric sheers.  Well it would be so much easier if I had a better rotary cutter.  I purchased the cheapest one when I bought mine because I didn't imagine I would be using it that much.  But after cutting out 100 cloth wipes with it I realize that a more expensive ergonomic model will easily pay for itself in time saved and avoided hand cramps.

So that is it.  By the way, the pattern I am cutting out in the first picture is a little bohemian top for Lyla that I plan to embroider (my newest hobby).  I also will have some *gasp* house stuff to post on in the near future since we are getting the bonus room redone because it has had water damage the last two springs.  I am excited to share many projects in that room over the summer!

Monday, March 14, 2016

Sewing for Baby: Infinity Scarf Bib

*update: the pattern that I used has resurfaced and you can buy it here on Etsy! I have edited this post to remove some of the actual tutorial because I don't want to steal someone else's work.  I only included a tutorial for this originally because the original tutorial I followed was no longer available.


Uff da, it is mid-March and I haven't blogged since mid-February.  Where did that time go!?!?  I have been doing lots of projects but I haven't been very motivated to blog about them lately for some reason.  I think it must be spring fever from the nice weather we have been having.  Unfortunately we are going to be back to winter temps later this week, boo.

My daughter will be 8 months in less than two weeks and I am finally getting around to share the drool bibs that I made for her a few weeks before she turned 7 months.  She popped out 2 teeth at the end of February/beginning of March and has been drooling like crazy.  I was at Target and almost bought some cute bandanna bibs but then I looked at them and thought "I can make these."  When I got home I started looking for tutorials and then I came across the pattern and tutorial for these infinity scarf bibs.

 I started by using the pattern to cut out 2 pieces of each part. I used some scrap jersey knit fabric leftover from other projects.


Next I placed the pieces right sides together and sewed them with a 1/4 inch seam allowance leaving a small opening close to the end.
I clipped the fabric around the curve so that the curve would lay better and then I turned them right side out and topstitched the opening closed.
Next I laid the end of the smaller piece on top of the end of the larger piece and topstitched them together just around the curve.
I then twisted the larger piece around the smaller piece so that the larger piece was on top of the smaller piece on the other end and topstitched them together.
This step helped to give the bib the looped appearance of an infinity scarf.

Finally I installed a snap on the ends of the scarf.  I have a pair KAM snap pliers and I love them so much. They have so many colors of snaps.  They are great for many projects and are so fun!  I chose a lovely coral snap for this scarf bib.
They take just a little bit of knit fabric and are so easy to make.  I just discovered that Girl Charlee Fabrics sells half yard cuts of fabric for around $3 a piece so I have been churning out a ton of these babies.  
I am so in love with the simple project! They are very effective in catching all the drool too so they are cute and functional.  

How amazing is the lime green snap on this one! 
I can't believe that this big girl is almost 8 months now!  

Here is a look at some of the other projects in the Sewing for Baby series:

Related Posts Plugin for WordPress, Blogger...