Tuesday, February 16, 2016

Baby It's Cold Outside Baby Shower

A little over a week ago I co-hosted a baby shower for one of my best friends, Krista, who is expecting a baby boy at the end of March.  Since it was going to be a winter baby shower, I thought that "baby it's cold outside" would be a cute theme.  So one of my co-hosts, Katie, whipped up an adorable invite and we were off and running with the planning phase.  
We chose white and baby blue for the colors, decided to do one game and a craft, and came up with a menu.  Katie was in charge of the guest book and most of the decorations.  I loved what she chose!
It was such a fun idea to use a book as a guest book!
Don't you love the cute sock tree and "baby it's cold outside" sign!

For food we decided to serve soups and tea sandwiches.  My other co-host, Emily, cut all of the bread for the chicken salad sandwiches into snowflake shapes!
Click here to get the recipe for the southwestern chicken salad.  I didn't have much mayo on hand to I used greek yogurt instead and I never use packaged taco seasoning because of the sodium content to I just added cumin, chili powder, salt, and pepper.

Katie made some delicious cucumber sandwiches and a pasta salad.  Katie and Emily made 3 soups: wild rice, minestrone, and chicken tortilla and they were all yummy.

In lieu of a cake we decided to serve cake pops.
I made the cake pops using a babycakes cake pop maker that my mom bought for me.  I used the white cake recipe from 175 Best Babycakes Cake Pop Maker Recipes.  The book is nice because it includes lots of tips and tricks for baking and decorating your cake pops.  I made 60 cake pops and was able to put the sticks in and then freeze them a few weeks in advance.  A few days before the shower I took them out of the freezer and decorated them.  Dipping the cake pops after they have been in the freezer actually makes the process easier.  I used blue and white candy melts and then sprinkled large sugar crystals over them to get an icy wintry effect.  The cake pop stand was purchased a Michaels.  I was going to make my own stand but the cost of the materials ended up being the same as the pre-made stand so I opted to go with the easiest route for a busy mom.  I cut out some snowflakes from white card stock with my Silhouette Portrait and then attached them to some wooden skewers which I taped to the top of the cake pop stand.  The bunting was made with washi tape and baker's twine. I used a washi tape bunting on the hot air balloon mobile for Lyla's room.
Krista's mother-in-law, Barb, also provided us with many delicious goodies for the shower.  She is an excellent cook and baker.  I am kind of bummed because I didn't actually try any of them since I was so busy running around making sure everything was going smoothly.  Barb also made some delicious blue punch and Katie filled a drink dispenser with water and put lemon and orange slices in the dispenser to make "spa" water.

So adorable!

We also had a hot chocolate bar.  I have done hot chocolate bars for my last two New Year's Eve parties but I decided to take it up a notch with this one by adding matching containers and a bunting sign.  I found the containers at Hobby Lobby and used a chalk marker to label them.

You may recognize the candle holders and vase from my home.  I use them for winter decor every year and I bought them at Target several years ago.  I decided the berries in the vase would add a little pop of the red just like the red bird in the invite.

I purchased the fabric pieces for the bunting at Michaels.  They have tons of colors so your can find some for any event that you are planning!  I cut out the letters and snowflakes from card stock with my Silhouette Portrait and then I attached them to the fabric with glue dots.  I attached the fabric pieces to some baker's twine with hot glue.  I made the mistake of laying my letters out in order and then flipping them over to glue them with the word "HOT" so when I turned it around it said "TOH" haha.  Luckily I used the removable glue dots so I was able to just swap the "T" and the "H" for a quick fix.

For mix-ins for the hot chocolate bar I included crushed peppermint candy, toffee, white chocolate, dark chocolate, milk chocolate, peanut butter chips, sea salt, marshmallows, pirouette cookies, whipped cream, caramel syrup, and toasted marshmallow syrup.  I used this crock pot hot chocolate recipe which is one of my favorites.  One tip for getting the stubborn cocoa powder to mix in with the rest of the ingredients is to use an immersion blender.  It works like a charm!

After eating, we played one game that Katie planned and then we made alphabet blocks which was my project to plan.
I will have another post on the block craft soon because it is one of my most ambitious Silhouette projects yet.  Everyone seemed to enjoy the craft and the blocks turned out great!  For centerpieces, in addition to the block supplies, I used the jars from Lyla's baptism brunch and made a few more snowflakes from white card stock with my Silhouette Portrait.  I then attached two back-to-back with glue dots and then slipped them over a wooden skewer.  I placed a little bit of floral foam in the bottom of the jar and stuck the skewer in.  I had some fake snow on hand from a Sunday school craft that I did a few years ago so I put some in the bottom of the jars to cover up the floral foam.  The other centerpieces were already on the tables and they fit perfectly with our theme!
And that folks is how we chose to throw a "baby it's cold outside" themed baby shower!  It came together beautifully and was a blast.  I will be back very soon to share how I created the alphabet block craft for the shower.


Sunday, February 14, 2016

Sock Valentines


Happy Valentine's Day!  Today I have a fun and simple valentine project to share with you.  When I saw that my daughter had a Valentine list from daycare a few weeks ago my first thought was that it is crazy to give valentines to babies because they don't understand it.  I mean none of the children in her room at daycare are older than 10 months!  But my next thought was "sometimes you just have to make valentines for babies because it is fun!"  I would like to note that it was not required that we make valentines for the babies in her class, it was just for fun.  So I found myself typing "valentines for babies" in the search bar on Pinterest.  I found several cute ideas but when I found the sock idea I knew that was what I wanted to do.  Lyla has a drawer full of socks that are missing their match so I figured that other babies probably have the same problem.

On a side note, I saw an idea on Pinterest to keep a mesh laundry bag by the baby's hamper to corral the socks and then they get washed and dried in the bag and never lose their mate!  Why did I not see this idea before I had Lyla!

So I went to Old Navy and found some 4 packs of baby socks on sale.  Then I quickly whipped up a print and cut design in my Silhouette software.  I am including a link to a PDF file that I made of the valentines for those of you that don't have a Silhouette and I have also attempted to link the SVG file for all of you Silhouette owners.  I'm crossing my fingers that it works for you.
Sock Valentine PDF
Sock Valentine SVG


I think they turned out to be pretty adorable.  Simple and easy!  As I write this post I actually have another post written and edited and ready to share.  That means virtually back-to-back posts.  Keep your eyes peeled for a post on a baby shower that I co-hosted in the next few days.

Sunday, January 17, 2016

Sewing for Baby: Three Baby Skirts

Hello lovely readers!  Lately I have been pretty obsessed with sewing.  I have gotten over most of my fears when sewing and I love trying and learning new things.  I am currently in the middle of sewing quite a few baby things for other people but I can't resist throwing in a few projects for my baby girl. Today I have a post on three tutorials from other bloggers that I followed to make some adorable skirts.  But before I get to that, I wanted to share some more cute leggings that I made for Lyla to wear during the holiday season.  You can read more about the leggings in this post.
Seriously how cute are those leggings!  The fabric was another jersey knit from Girl Charlee Fabrics. Ok we'll move on to the skirts now.
The first skirt is actually a pattern that I purchased on Craftsy.  The pattern is called Twirly Baby Skirt.  The pattern isn't free but the cost is under $5.  The fabric I used was a Cotton + Steel print.

Things I Liked

  • the flat front on the waist band
  • the overall look of the skirt
Things I Didn't Like
  • gathering-mostly because it was my first time doing it-I just need more practice
  • the sizing was way off: I made the 6-12 month size and it seems more like 0-3 month size  
  • the tutorial could of used more pictures to make some of the directions more clear
I don't have any pictures of my Lyla modeling this one because there was no way she could fit in this. I will find a tiny baby girl to fit in it, don't worry.  This fabric is too cute to waste.

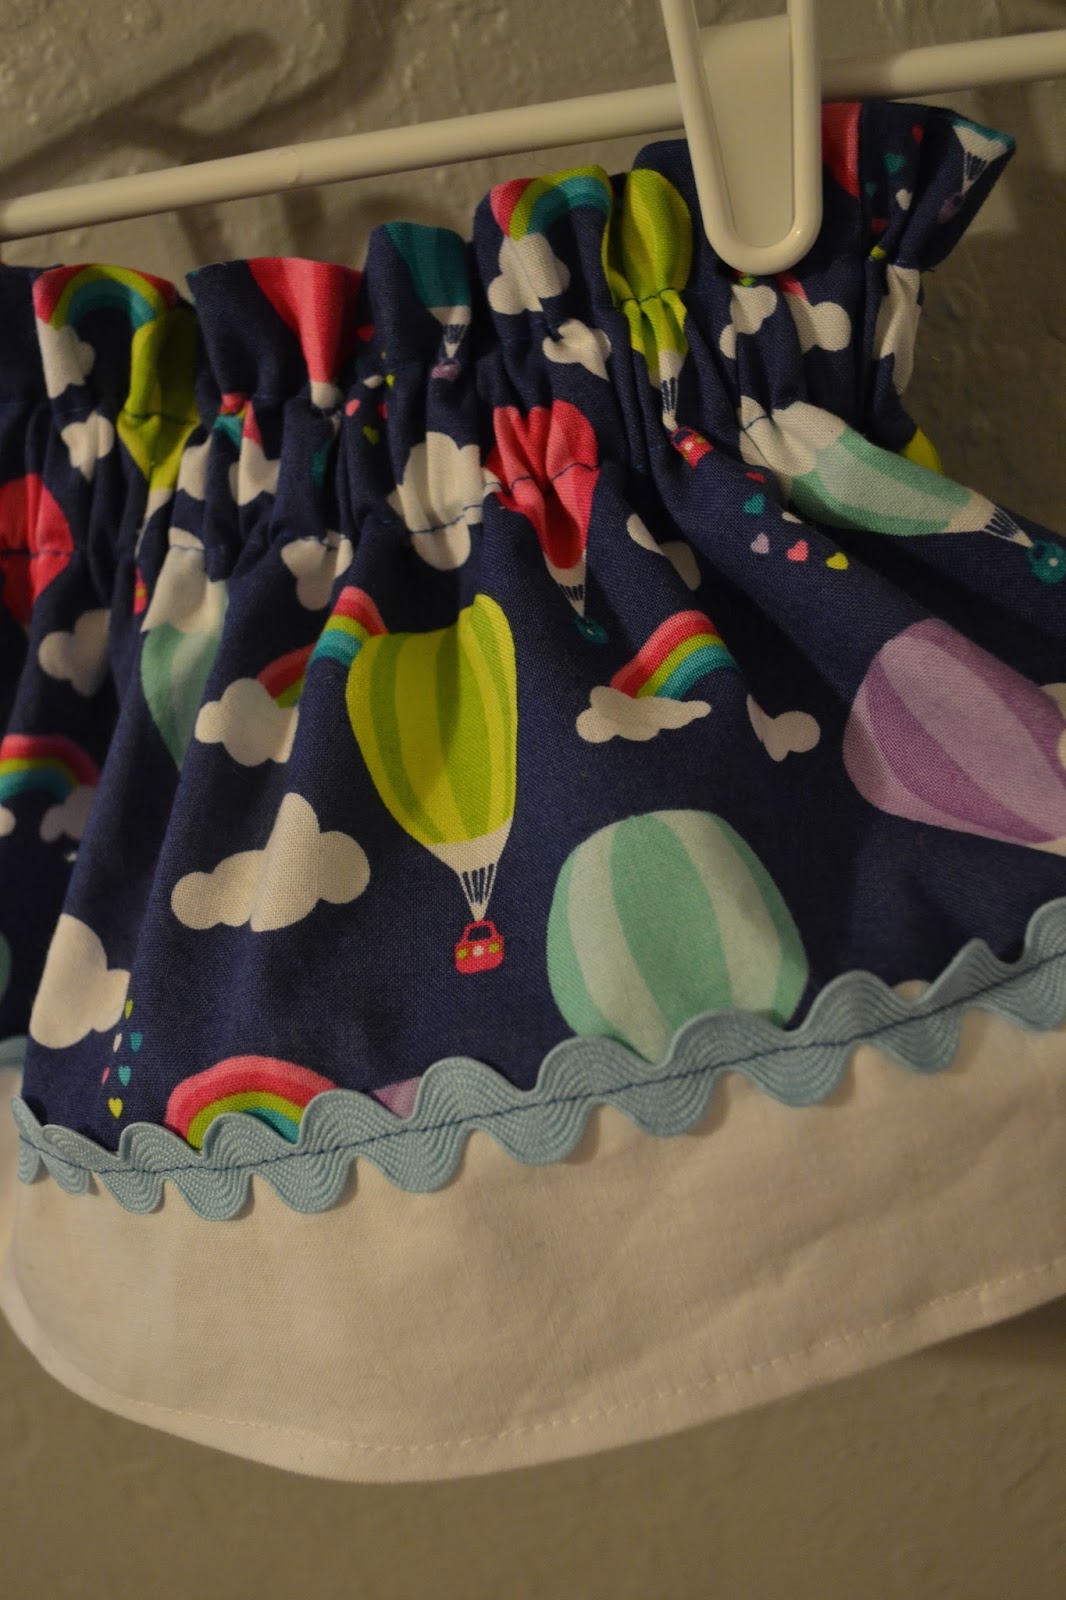
My next skirt is by Pitter Patterns and is called Simple Skirt Pattern.  It was a free pattern. I found the hot air balloon fabric at Joann Fabrics.

Things I Liked
  • no cutting of pattern pieces-all the pieces are rectangles so you just have to measure
  • the elastic casing isn't right at the top of the skirt-an interesting detail
  • the accent strip also gave a nice look to the skirt.  
  • the directions were very clear
Things I Didn't Like
  • nothing!  I loved this one so much
This pattern also included a sash but my little almost 6 month old loves to grab things so I knew it would be off in two seconds.  The skirt is just as adorable with out it.  I added the ric rac trim to add another cute detail to it.  


Seriously how cute is this skirt on my little model!  I just love it!
The last skirt is from Punkin Patterns blog and the post is called Easy-Peasy Skirts.  The fabric is from Joann Fabrics.  Cats and teacups, so cute!

Things I Liked 


  • it was so easy, just like the title of the tutorial indicates
  • directions were easy to follow
  • you calculate the measurements of the skirt by measuring the child you are sewing for so the fit is tailored to the recipient of the skirt
Things I Didn't Like
  • that mini pom pom trim was hard to sew on!-but that is my fault for choosing to add it.
I added mini pom pom trim which looks so cute but it was difficult to sew on.  I thought I could make it easier with the zipper foot but that didn't really help so I just had to forcefully guide it through.  It doesn't look so neat on the inside but you can't tell on the outside.

This skirt also looked great on my model of course.  I do not recommend using 6 month old models though ;).  They are very hard to photograph as evidenced by these outtakes.
 40 photos taken=3 non-blurry photos
Also, 6 month old girls aren't always very lady-like.
Well that is it for tonight.  I will probably have at least one more post for January but we'll see.  

Thursday, December 31, 2015

Baby Footprint Art

Wow it is hard to believe that this is my last post of 2015!  It has been a hard year in many ways especially with the loss of both of my grandfathers and my husband's best friend but the shining light of it all has been my pregnancy with my daughter and her birth this past July.  I am looking forward to a great 2016 with our newly expanded family!

Today's post is about the gifts I gave Lyla's grandparents and father for Christmas.  I knew I wanted to give them framed prints from Lyla's newborn photo shoot but I also wanted to throw in a personal touch with Lyla's footprints.  I didn't take any photos of the acquisition of the footprints because I had my hands full enough trying to prevent paint from getting everywhere.  I put some newspaper under her Bumbo seat and then stripped her down to her diaper and changed her into a disposable.  She sat in the Bumbo while I painted her feet with tempera paint and got the prints on paper.  I tried handprints too but since she is in the phase where she wants to grab EVERYTHING it was pretty much impossible to get a good one so I quickly gave up.  It would have been a real struggle to get as many prints as I needed for each gift so I decided to just get one good set and scan them into the computer.
Then I was able to open the prints in Pixelmator and remove the background by using the magic wand tool (the process is the same if you have Adobe Photoshop).  I then saved the image as a Portable Network Graphic (png file format).  Now I had a set of footprints that I can use over and over again.  I can even put them in her digital baby book as stickers (I'll tell you more about that in the future).
Next I opened up the Silhouette design software and imported the footprints.  I made sure to resize the prints to original size.
I was then able to rotate them and make them into a "V" for the word "love."  I made a box roughly the size of a 5" by 7" photo and then used a font called South Rose to spell the rest of the word. I used the shape fill and line color windows to get the letters the way I wanted them to look.
I had selected a mix of landscape and portrait oriented photos from her newborn photos for the gifts so I had to make art in both orientations as well.  Finally I opened the registration marks window and added registration marks so that I could use the print and cut feature.


I found these two-photo frames at Michaels.  I love how these simple and meaningful gifts turned out! Hopefully these will give you some inspiration to make your own footprint or handprint art. You may have noticed that I put her footprints inside a heart on the above photo so that is another idea for you.  I will be back in 2016 (wow that seems weird to say) with the next post in the Sewing for Baby series on making baby skirts!

Wednesday, December 23, 2015

Hot Chocolate Mug Gift Pouches

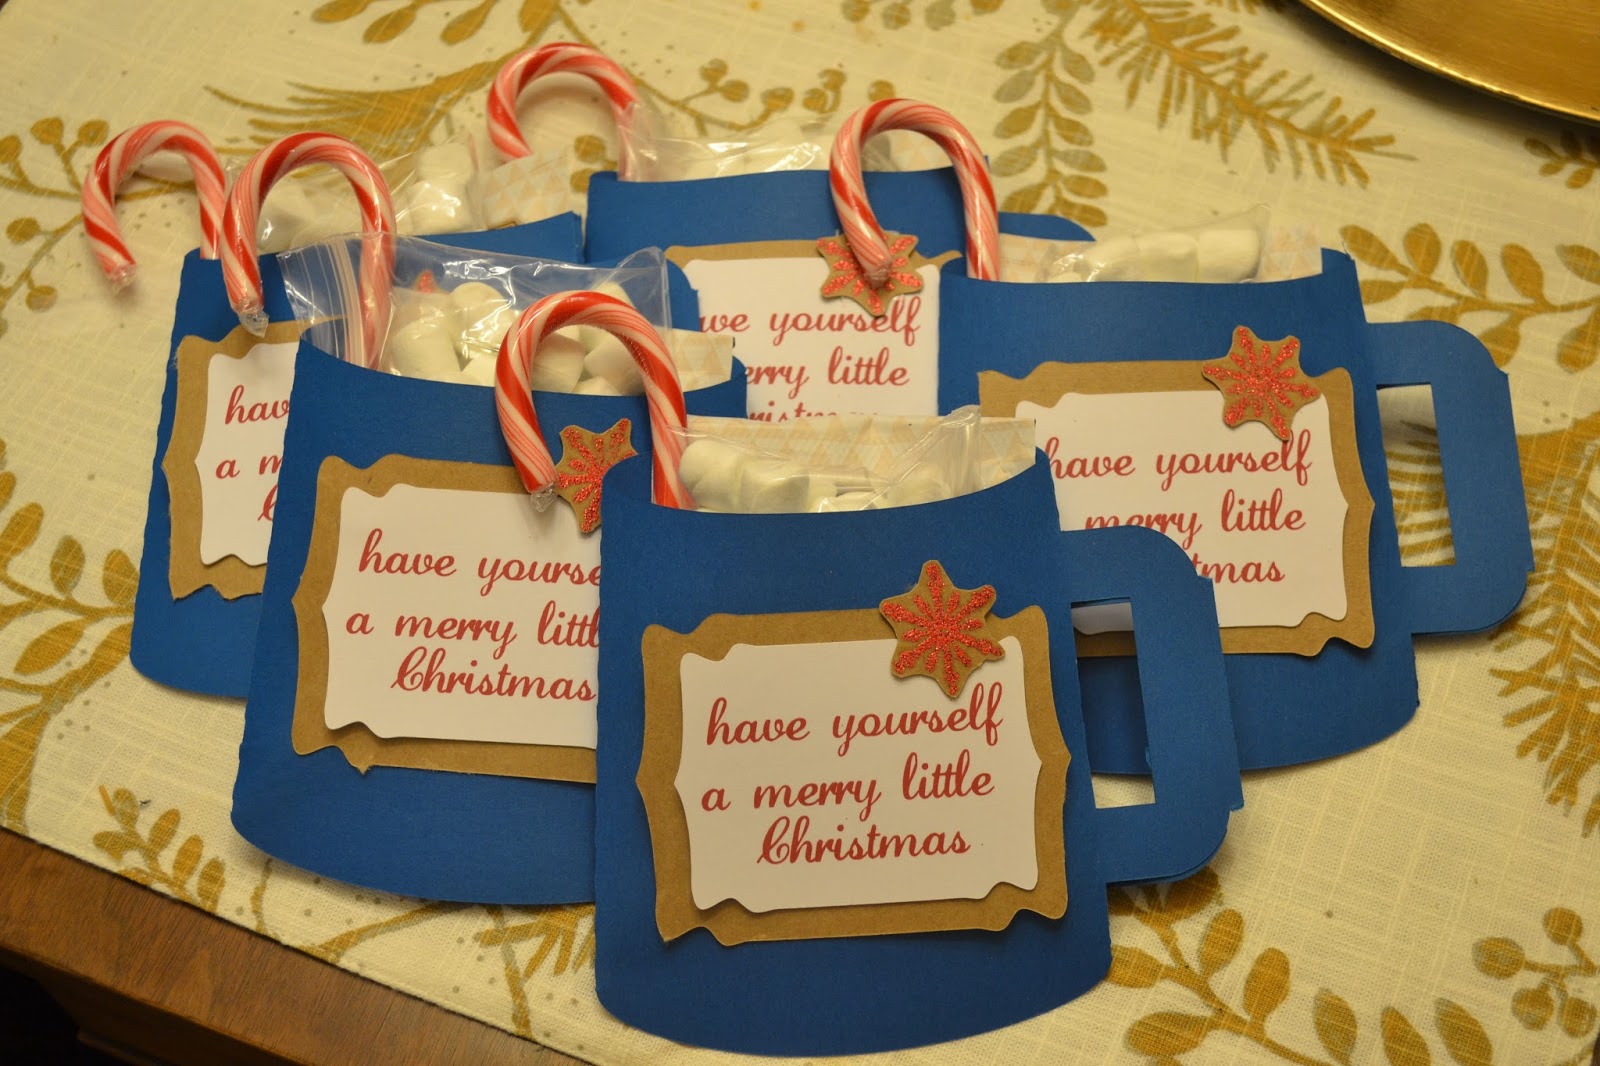
Sometimes I am on the ball and churn out several posts within a week of each other.  This would be one of those times.  Today's project was actually one that I came up with last minute.  I realized about a week ago that I should probably give Christmas gifts to the staff at Lyla's daycare.  So (*this will come as a big shocker*) I scoured Pinterest for ideas for simple, inexpensive gift ideas.  I decided that I wanted to do some sort of hot chocolate gift. Then I found this design from the Silhouette Design Store and I instantly had my idea planned in my head.
I liked the Santa design but I quickly discovered that the only red card stock that I had was kind of a pinky red that seemed more magenta than true red.  I did however have some lovely blue card stock, white card stock, and kraft paper so I started to figure out a design.  I decided that I would make the mug pouches blue and use the kraft paper and white card stock for accents.

I started by making some embossed snowflakes on kraft paper and then cutting them out.  This probably would of been a good application for PixScan but I was under a time constraint so I just opted to cut them out by hand.

During my first year of marriage to my husband, I decided to make Christmas cards since I apparently hadn't had enough card making despite the 180 invitations that I had made for our wedding.  I learned about embossing and decided to invest in the supplies to use the technique on our Christmas cards.  You can use any stamp to emboss.  You just need embossing ink, embossing powder, and an embossing drying tool which is similar to a hair dryer.
I love watching the powder change to liquid as the tool heats it up.  It is kind of similar to heating up the sugar on top of creme brulee with a kitchen torch.
I then used a shape that I already had in my library to create a message embellishment for the mugs. The larger background piece was cut out of kraft paper.  I used white card stock and the print and cut feature of the Silhouette to make the top piece.

One I had all of my pieces cut out I put everything together using glue dots (until I ran out of glue dots and had to use scotch tape).
I then placed a packet of Swiss Miss cocoa, a snack sized Ziploc full of mini marshmallows, and a candy cane in each pouch.
This would make a great simple gift for anyone to show your appreciation of them.  It could also make a great favor for a party.  Let me know what you think of my latest project!

Sunday, December 20, 2015

Infographic Christmas Letter

Merry Christmas a few days early!  This week I sent out Christmas cards so I wanted to write a short post on our Christmas card and Christmas letter.  I used Shutterfly for our Christmas card as usual. Last year I couldn't find any designs that I loved on Shutterfly so I shared how I created my own card design with Pixelmator in this post.  This year I found a design that was perfect so I didn't need to create my own again.  O Holy Night is one of my favorite Christmas carols.  In fact you may remember this art project that I created last year that used words from the carol.  I loved the blue color of the design too because it works so perfectly with the blues of our shirts in the photo that I chose for the front from Lyla's newborn photo session.  By the way, I want to give another shout out to Josette Hayes of exposures by j. linnea for taking this and all of Lyla's lovely newborn photos.  I look forward to many more photo sessions with her!

This year I decided to include a Christmas letter with our cards.  Sometimes, I just type some info on the back of the Christmas card itself but someone I follow on Pinterest was pinning infographic Christmas letters one day and I was intrigued.  I knew it would be fun to use my Pixelmator software to create my own infographic letter so I knew it was something I had to do.  So without further ado here is my version of an infographic Christmas letter:
I chose to use red and teal as my pops of color.  The best part of completing projects like this is the opportunity to use some of the fonts from my vast collection.  I have a serious problem with downloading fonts people! The house and heart were shapes available in Pixelmator itself and I found the U.S. map and other graphics on Google.  I just used the pen tool to color in the states that we visited this year.  Hopefully you will find some inspiration from my latest project!

Saturday, December 5, 2015

Monthly Baby Photos: An Update

So back in September I wrote this post on the photos that I would be taking of my daughter each month.  I was inspired by the vintage travel elements in her room to make a vintage travel setup for her monthly photos.
You may remember this sweet photo from her one month shoot.  Well she is now 19 weeks old and will turn 5 months on Christmas Eve.  Where is the time going?!?  Anyway, she has had 3 more monthly photo shoots since that September post so I wanted to share with you what the last 3 months looked like.


You can see how much she has been growing and changing! Here are my favorite shots from months 2, 3 and 4:


I think each one captures some of the milestones that she has reached each month.

Over Thanksgiving break, I decided to get started on the digital baby book that I am making for Lyla's first year.  In the future I will make sure to work on each month right after it happens because doing 4 months at once was a lot of work!  Here is a sneak peek at what the pages with her monthly photos look like:
I am using Mixbook instead of Shutterfly for this project which I will explain in the future when I write a blog post on it.  I am so excited with how the book looks so far but I have got a lot more things to put in it!

Well I hope you enjoyed the little update.  I hope to have a post on another sewing project soon.  I also have a post on Christmas cards and our new style of Christmas letter waiting in the wings so keep checking back!
Related Posts Plugin for WordPress, Blogger...