Tuesday, May 1, 2018

Giant Sewing Studio Pegboard


I can't believe it has been a year since we put our house on the market and went searching for a new house!  At this point in time last year I was nervous about finding a house since our house sold in 24 hours and we had a time limit of about 3 weeks to find a new one.  We saw several houses in the beginning that could of worked but we would of had to compromise on some of the things on our wish list.  This time around I didn't want to compromise too much because I knew that I wanted this house to be our forever home.  I'm glad we stuck it out even though our offer on this house got accepted with less than 24 hours to spare!  One thing that I really wanted in our new house was a dedicated space to sew and craft and this house has the perfect space!  Here are some before pictures of the space.


This little room is right next to our family room in the basement which is perfect because I plan on the family room being a play space for the girls.  Another great thing about this room is the storage!  Those built in cabinets are perfect for storing away many of my craft supplies.  In the last picture you can see the other side of one of the ugliest accent walls I've ever seen!  Here's what it looks like from the other side.
When I saw the listing for this place I laughed out loud when I saw the picture of this wall.  But despite this ugly wall I knew that the rest of the house is perfect.  Someday we will get rid of that wall but for now it is a good conversation point when people take a tour of our house!

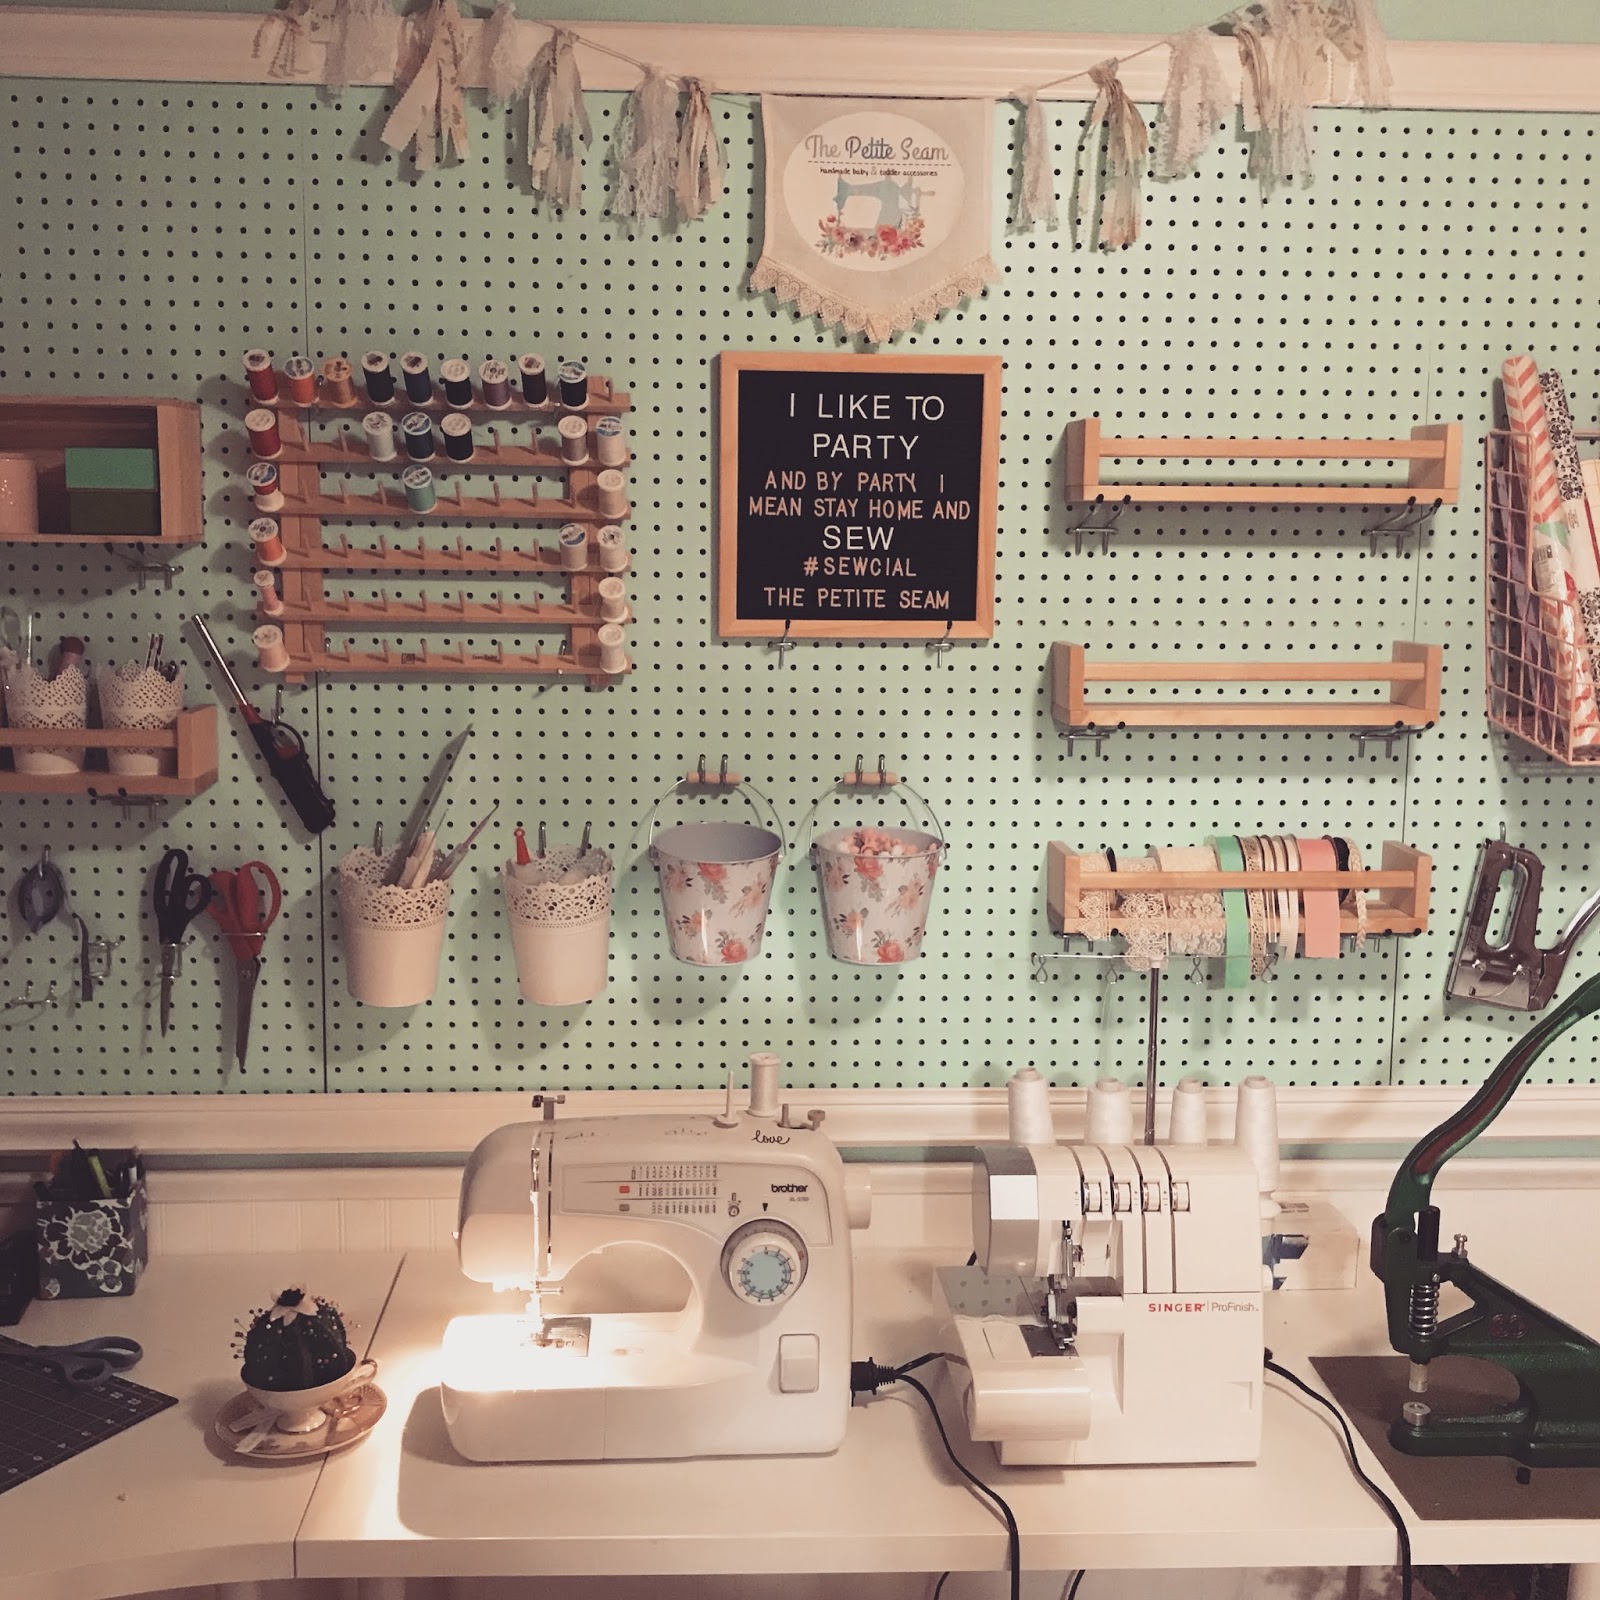
I'll talk more about the rest of the things in this room in a future post but today I want to focus on the pegboard wall.  After painting the room, we got to work putting up the pegboard.  I purchased these pegboards from Home Depot.  It would of been cheaper to buy one continuous piece of pegboard but these are nice quality and I thought it might be easier to hang four smaller pieces than one giant one.  I also purchased 3 pieces of 8 ft long one by twos, wood screws, and 3 pieces of 8 ft long flat crown moulding for the frame.

I didn't take any pictures of the hanging process but it was pretty simple.  We found the studs and screwed the one by twos to the studs (one at the top and bottom of where we wanted the pegboard and one close to the middle).  Then we screwed the pegboard panels to the one by twos.  Finally I cut the ends of the crown moulding pieces at a 45 degree angle with a miter box and saw.  I had to cut one of the pieces in half for the sides of the frame.  We used a pneumatic nail gun to attached the frame around the edge of the pegboard.


I was originally going to leave the pegboard white but I loved this wall color so much that I didn't want to lose so much of it behind the pegboard so I painted the pegboard to match the wall and then painted the frame white.

The hardest part of this is figuring out how to fill it up with stuff now that it is on the wall.  I bought an assortment of pegboard hooks and accessories to hang my tools and shelves and such.

I found this little letter board at Hobby Lobby.  It came with white letters but I also bought some smaller blush pink letters from Amazon.


I found this pink wire shelf/bin at Target.  I couldn't find it online to link it but it is from the Pillowfort collection.
It is so nice to be able to easily reach for my tools while sitting at my desk but also not having them on the desk and cluttering up my workspace.

A lot of my storage solutions for this pegboard came from either Target of Ikea.  These Ikea Skurar votive candle holders are perfect for holding various tools and they are so pretty.  By the way, I can never remember the weird Scandinavian names for Ikea stuff.  It took me so long to find the link to these because I couldn't remember what they were called.  I also have a few sizes of the plant pots from the same collection.  I'm using the smaller size Skurar pots on the pegboard and I have some larger sized ones hanging on the pegboard.  I have 4 of these Bekvam spice racks on the pegboard and I intend to buy more.  
Most of them will be used for ribbon and trim storage.  This is the BEST solution that I have found for ribbon and spooled trim storage!  In our old house I had my ribbon spools on a tension rod in the closet.  It was a pain to remove the spool though when it ran out because I had to take a bunch of them off in order to get the empty one off.  This works so much better because I can still pull it out to cut pieces but it is a breeze to remove them when they are empty.  I actually bought these spice racks to turn into little bookshelves in my daughters' rooms.  I'm glad I never got around to putting them up because this is one of my favorite storage solutions on this pegboard!
I found this little wooden crate in the aisle with unfinished wood projects at Hobby Lobby.  Those two boxes are a Kate Spade watch box and a Michael Kors watch box.  In the Kate Spade one I store my pattern weights (side note: I have searched all over for the Kate Spade watch that came in this box and I hope to find it soon or I will be very sad.  It is a black watch with pave cat ears around the watch face and I love it so much!).  I have needles and my other sewing machine feet in the Michael Kors box.  I found that little odds and ends container in the Target dollar section and I love that it is blush pink and has that light wood lid.
These floral buckets were also from the Target dollar section.  When I first found them there were only 2 of the floral ones left.  After putting them up on the pegboard I loved them so much that I knew that I needed more.  I checked that dollar section every single time that I went to Target for a month straight and was finally rewarded by finding 3 more.  A few are empty right now but the others are holding pom pom trim, elastic, and some other trim that I bought by the yard recently.

I took this little fabric and lace garland off of my daughter's teepee:
Photo credit Exposures by J. Linnea

I printed my Etsy shop logo on some printable heat transfer material and ironed it onto some linen fabric and then added some lace trim.  I'm so excited about this pegboard and my sewing studio.  It has been so much fun to sew in this room!  
I've also been busy working on the family room that is right next to this space.  Over my Easter break it got a new coat of paint and now I am working on a few fun decor projects including a way to display/store children's art, a fresh look for the benches that were on the porch at our old house, and a really cool decor project involving wool felt pom poms and paper mache letters.  I am also slowly working on some sewing projects related to cloth diapering so I hope to have an update on cloth diapering with those projects soon.  Also here is what I have been working on lately:
You can read more about the pattern and tutorial that I used for these bibs in this post.  And here's my now 7 month old cutie rocking the bib on the left:


Sunday, April 15, 2018

Teacup Cactus Pincushion

 Hello!  I'm making an effort to actually get more than one blog post in during the month of April.  It actually wasn't too hard since all I had to do was edit a few photos that I had already taken.  I'm excited to share this fun tutorial with you today.  I've wanted to turn one of my vintage teacups into a pincushion for quite sometime but I had been seeing some adorable succulent and cactus pincushions lately that really caught my eye.  Then I had the brilliant thought to combine the two and I love how it turned out.
If you have been following my blog for awhile you may remember this post about planting succulents in teacups (so this is my first time at the teacup succulent rodeo ha ha).  For this project I decided to use my favorite blush pink and gold teacup and saucer that a friend gave me several years ago.  It goes great in my sewing studio as I have a bunch of blush pink accents in the space.  I started by gluing my teacup to the saucer with hot glue.  Next I measured how tall I wanted my succulent to be and found a circular object that was close in diameter to that measurement.  Then I grabbed a piece of green felt and drew 6 circles on the felt.
Next I cut out the felt circles with pinking shears.
Then I placed two circles together and sewed around the edge leaving about 2-3 inches open at the bottom.  I repeated this step with the other 4 circles.  I used my sewing machine for this step but you could hand sew them too.
Next I stacked the 3 sewn pieces on top of each other and hand stitched a straight line down the middle of the stack.  Make sure all of the open parts of each piece are lined up with each other before you sew them together.


Next I filled the cactus with steel wool (you could also use filler that you would use for stuffed animals but I thought the steel wool would help to keep the pins sharp).
Finally I found some black felt and cut a strip and cut it like grass for a kids art project (does that make sense...my baby/mommy brain can't seem to think of better words to describe that today).  I placed a little dot of hot glue on one end and rolled it up and placed another dot of hot glue on the other end to make the center of the flower.  I apologize that I didn't take a picture of that step.

Then I freehanded the flower and cut out two pieces from pink felt.

When I glued the flower pieces to the cactus I placed the top piece so that the petals lined up with spaces between the petals of the bottom piece.  Finally I glued the stamen piece in the center of the flower.

The final step was just to add the pins.  I think it is so cute and love having the saucer underneath to hold little items like small safety pins, a few of my labels for my Etsy shop items, and my little embroidery scissors.  


Next time I write a post I will be very excited to share my sewing studio and my giant pegboard with you.  It is quickly becoming one of my favorite spaces in this house!  

Tuesday, April 10, 2018

Sewing for Baby: Booties, Bibs, and Blankets


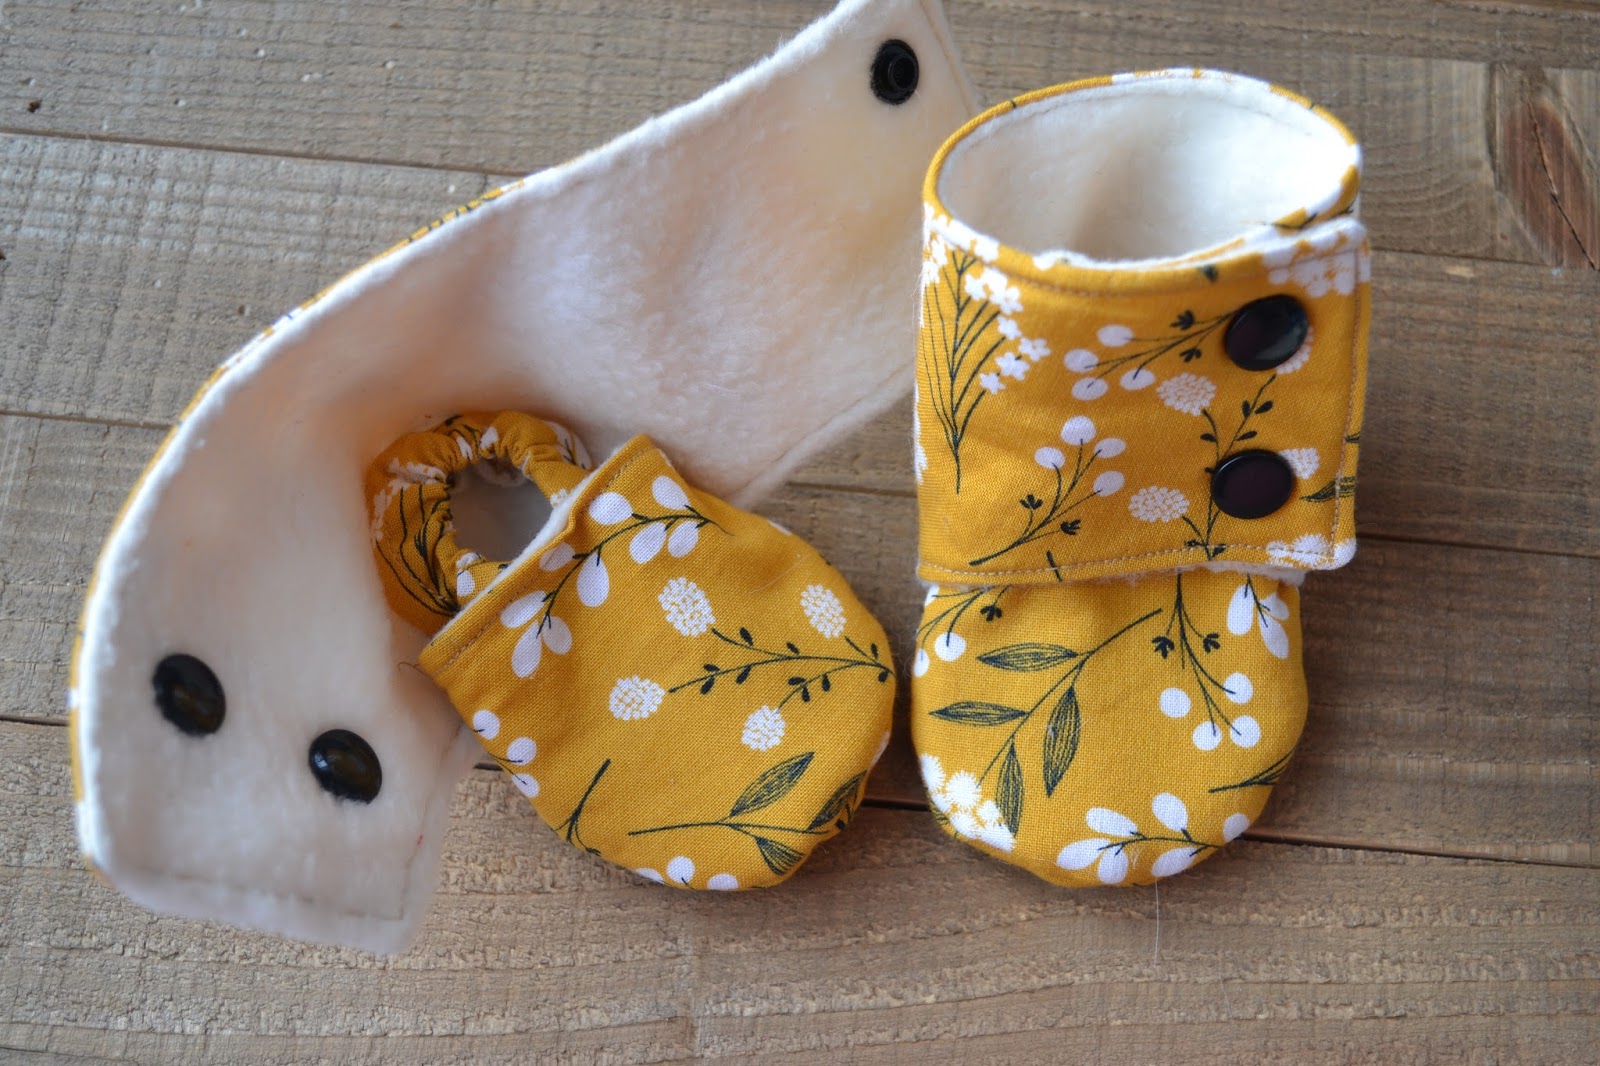
Man life has been busy.  It seems that I can only manage a post or 2 every month.  I've been busy with many projects lately but I haven't had much time for blogging about them!  Today I've managed to find some time to write another post in the Sewing for Baby series that I started back when my oldest daughter was a baby.  I have not one but three fun sewing projects to share with you today!  First up is my favorite thing to make lately: baby booties and shoes.  The pattern that I used for all of the examples in today's post is Maggie's Stay-on Baby Booties by Beautiful Pie Shop.  I've had this pattern for a long time but never tried it until a friend wanted some stay on type shoes for her daughter.  

I made my first pair for her using gray fleece and flannel lining.  I love this pattern so much.  It is easy to follow and they are really fun to make.  Plus they really do stay on!  I love them for my youngest because socks never stay on her feet and she is always pulling her carseat cover off of her feet.  I no longer worry about her little feet freezing!  I love making them so much that I now carry them in my Etsy shop The Petite Seam.  They can even be made without the cuff which you will see in a few of the photos below.


And here is my sweet baby girl modeling them in her 5 month photos (she is over 6 months now!)

 The next project is one that I have yet to make more of but I plan to make a lot more of them.  I hope to list them as a new item in my Etsy shop soon but so far I've only made one as a gift for a friend.


I used this tutorial for rounded pom pom bibs from the blog Life on Waller.  I didn't follow the tutorial to a T however because I hate hand stitching so left a small opening, flipped it right side out, then topstitched the entire bib.  I think topstitching makes it look more finished anyway.  The blog also has a tutorial for a fringe bib which I'm going to try next.

My final (or maybe not *wink wink*) project for today's post is a taggy blanket.
This little blanket was so easy to make.  I found some wooden teethers on Amazon but there are also some great ones on Etsy.  I cut a piece of cotton fabric and a piece of minky 17" by 17".  Then I cut a bunch of different pieces of ribbon about 4" each (it was around 32 pieces).  Just make sure you use ribbons with varying textures to make it interesting for baby to play with.   I wish I would of taken a picture of this step but I just folded each piece of ribbon in half and pinned the ends of the ribbon pieces to the right side of the cotton fabric.  For the wooden teether I just cut a slightly longer piece of ribbon and tied it around the teether and pinned that ribbon to one of the corners of the cotton fabric. Then I pinned the cotton and minky right sides together.  I sewed around the edge with a 3/8 inch seam allowance making sure to leave a roughly 2 inch opening. Then I flipped the blanket right side out, pressed, and pinned the opening shut.  Finally I topstitched around the entire blanket.
The watercolor blanket was a part of a baby gift for a friend but I also made one for my baby to go in her Easter basket.  I forgot to take a picture after it was done.  If you look closely you can see the pins in this one because it still needs to be topstiched.  Also that pacifier clip will be a future blog post :).

Finally I have a few more things to share with you that kept me busy at my sewing machine in February.  You may remember that I recovered the glider cushions in my daughter Lyla's nursery (I'm using the same glider in Ana's room now).  You can read more about that here.  Recently my friend asked me to make slipcovers for the glider in her daughter's nursery.  I love how this glider turned out.  The cushions before were a light green.


 I also made a few changing pad covers for her.  You can read more about those in this other Sewing for Baby series post.

Also how amazing is that mid mod dresser that they painted teal!

This isn't all that I've been busy with of course.  I have also been working on a couple of more sewing projects related to cloth diapers that I will share in a future post that will also include an update on our cloth diapering experience.  As far as home improvement projects go I've taken my focus downstairs with our family room and my sewing studio getting paint jobs and some other exciting projects in the sewing studio which I will give you a hint at in this picture.
I will give you a tutorial on how to make that cute cactus teacup pincushion that you see next to my sewing machine in my next post!


Tuesday, March 20, 2018

Living Room Updates

 Hello!  I am back with a post to finally show you all of the updates we've made to the living room since we moved in. It is hard to believe that the room that you see above once looked like this:


Those dark purple walls were really making the room much darker than it needed to be so the first thing that changed in the room was the wall color.  I love this lovely greige by Behr called Silver Drop.  In fact, I love it so much that I'm thinking about painted all of the remaining walls in the upstairs the same color.  I am also going to be using painting the family room in the basement this color.
The second big change was that fireplace.  You can read about that transformation in this post.  The other new items that you see from this angle are our new sectional, a large storage ottoman, a couple of Agen Armchairs from IKEA, and some white linen curtains that I found at HomeGoods.  I hung up my watercolor skyline of Tulsa that you can read more about in this post.  I made the cushions on the Agen chairs (they aren't my best work so I won't be sharing a tutorial with you but they get the job done haha).  The pillows on the chairs were ones that I already had but I plan on eventually getting matching pillows for those chairs. We removed the ceiling fan in this room (it was just the fan, no lights on it) and put up this light fixture from Wayfair.  I love how the black of the light fixture works so well with the curtain rods (another Target purchase) and the black in the tile of the fireplace.
These pillows came with sectional and I may eventually change them out but the yellow actually works well with the yellow fabric on the backs of bookcase.
On this side of the room we set up the two bookshelves that were in the corner of our old living room on either side of the Liatorp sideboard that was in our bonus room in our old house.  The baskets on the sideboard are all TJ Maxx and HomeGoods finds.  Those bookshelves are kind of messy right now, eventually I will get them more organized.  Also our vacuum cleaner has a nice cameo in this picture oops.


Speaking of messes, note the lovely pile of toys behind the blue chair.  Our old storage ottoman from our living room is housing most of the toys but there is some overflow.  I plan to get some nice large baskets for some of them and the rest will move to Lyla's room.
And here's the not as nice angle in the room.  This way you can see more toys and a lot of blank walls.  I definitely need to put some art and decor on those walls but I like to be really purposeful about what I put up so I'm still coming up with ideas.  The blue armchair will probably move to the far corner where those toys since it is kind of crowding the piano area.  I plan to either get a new end table or give that one a makeover.  I like that it has storage inside of it but it is a little chunky.  Other plans for this room include getting a small table to go between the IKEA chairs, making roman shades out of the mini blinds on the windows, finding a lamp to go on the end table and maybe even  buying floor lamp for that corner where the blue chair might be moving to. I am pretty happy with how this room has turned out and I love spending time in here and having people over to hang out in here! 

Next up for the blog I have a large post for the Sewing for Baby series which will also include an update on cloth diapering in our household.  I have also begun work on my sewing studio in the basement and I have several projects in there that I will be excited to share with you.
Related Posts Plugin for WordPress, Blogger...