Saturday, April 18, 2015

A Porch Update + Nursery Art

Today's post is a combination of two small projects.  First, I have a little update to the porch window seating.  This is what it looked liked before:
Not too shabby right.  The only thing that I didn't like was the open cubbies on the Ikea Expedit shelves.  Ikea makes door inserts for their Kallax shelving units (formally Expedit).  They are $15 a piece so it wasn't the cheapest of updates but I think it was totally worth it.


The lighting wasn't nearly as good as it was in my before photo and don't mind those little gnomes hanging out in the window.  That is where they live in the winter!  The inserts were very easy to install with the exception of a few cubbies that had screws blocking the way because that was where the mdf was screwed into the Expedit shelf.  I just had to cut some pieces out of the backs of the inserts to get them to slide into those cubbies.

I like how much more built-in the benches look with the doors installed.  I also like that things stored in the the cubbies can now be hidden which will make the space more functional and less cluttered. I think that the door inserts also add even more stability to the benches.  They don't creak at all when I sit on them now (even at 6 months pregnant)

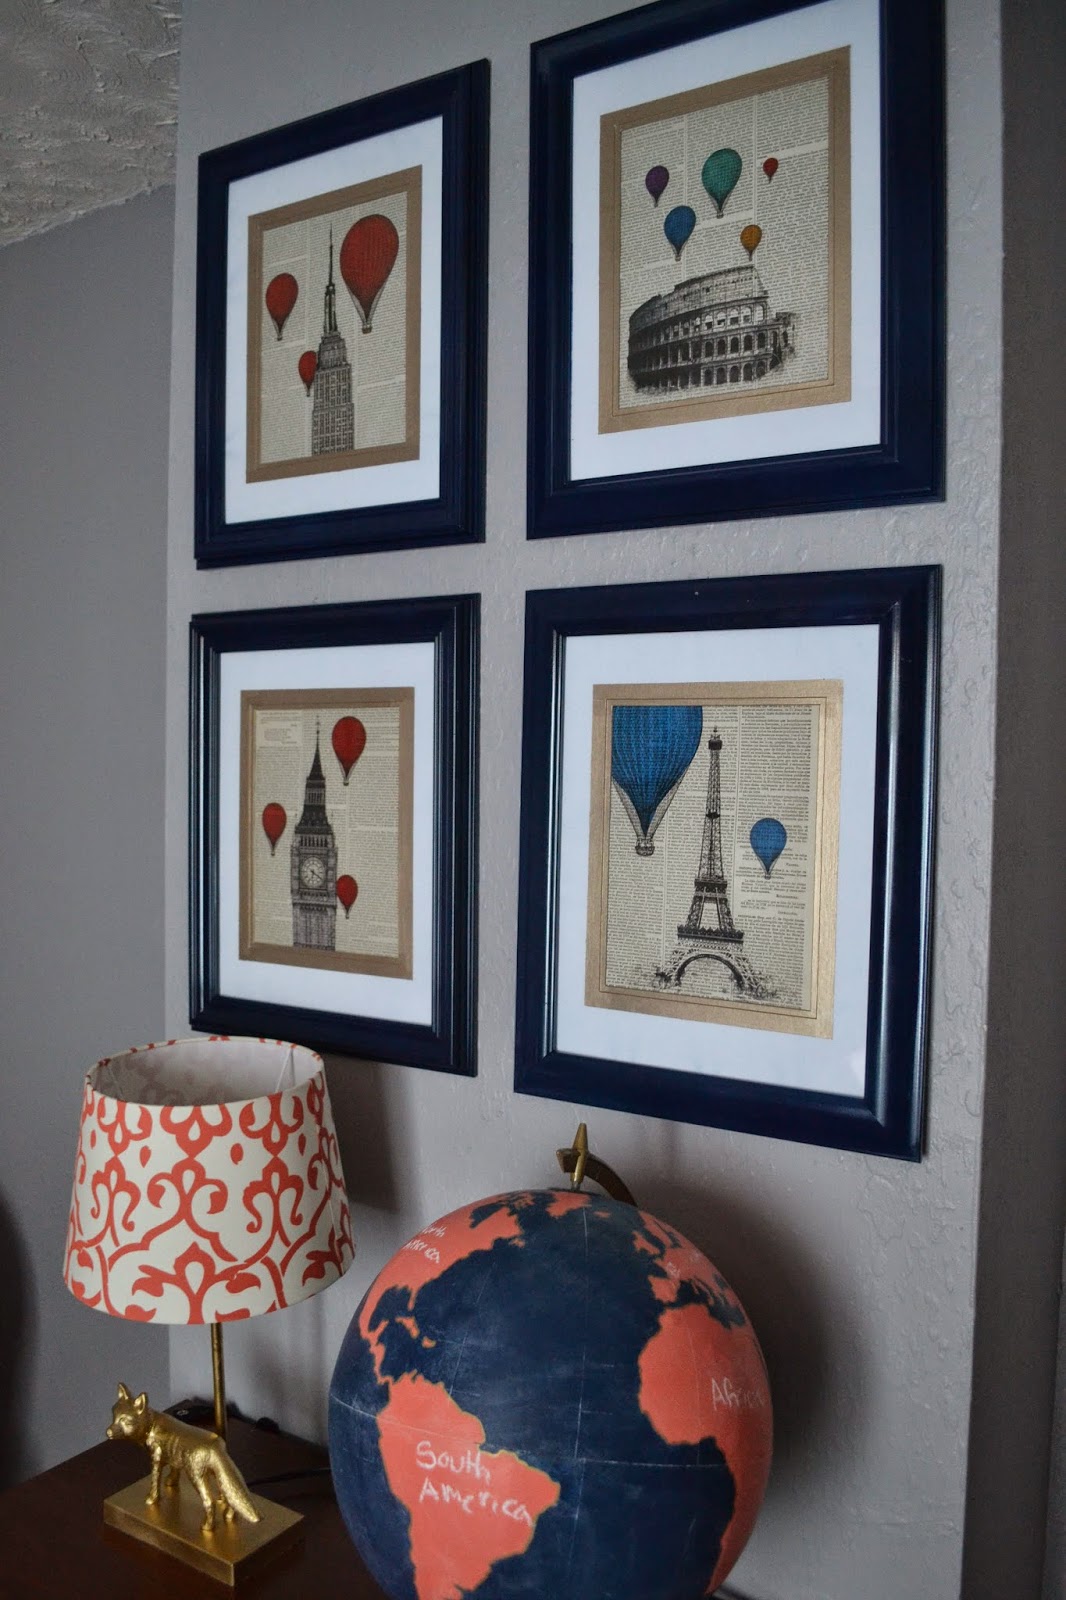
Next up is another nursery project.  This was one of those projects where I thought I took more pictures but when I was uploading them from my camera I discovered that that was not the case, sorry! One of the things that I have become obsessed with while designing this nursery is hot air balloons.  I think that they are the perfect vintage travel vehicle and are so whimsical (just wait until I write a post on the decoration that I made for above the crib!)  A long time ago when I found this print for the porch, I also found some awesome hot air balloon prints.
The prints come from an Etsy shop called PRRINT that prints on vintage dictionary pages.  I knew that I didn't want to cut the dictionary pages down to a standard size so I found 4 similar frames with mats at TJ Maxx.  I wanted to add a little pizzazz to the frames so I started by painting the inner portion of the mats gold.  Here is the one process pic I took for this project where I had taped off the mat with painters tape:
The frames were all black which wasn't quite what I wanted so I decided to spray paint them all navy. Unfortunately the glass was glued into the frames so I spent a lot of prep time covering the glass. Also it is sometimes challenging to find a good day to spray paint in North Dakota because even when it is warm enough outside it is often ridiculously windy.  Last Saturday I found a window of about 3 hours where the temp was warm enough and the wind hadn't picked up yet.  Today I am hoping to spray paint something else so I am hoping the wind will cooperate today.  I used Rust-Oleum Painter's Touch in navy blue.  This is the first time that I have used the Painter's Touch paint and I have to say that it is awesome.  It took one coat folks and it turned out smooth and glossy.  I am not the best spray painter in the world so I appreciated that this looked so nice even with my lack of spray painting skills.


Now in some of these pictures it is hard to discern that the frames are in fact navy but that is just the nature of navy blue.  

Here is a picture that shows you what a mess the rest of the nursery actually is right now.  Those trim pieces in the corner are quarter round for our bedroom which has been a project on our list for over a year now. Better get on that soon!

By the way, I picked that adorable fox lamp up at World Market.  I spray painted it gold when I was spray painting the curtain rod a few weeks ago.  The bookshelf is from Target.

Well that is about it.  I hope to be back soon with a fairly detailed post on the decoration that I made to go above the crib in place of a mobile.  It is seriously one of my favorite projects so far so I can't wait to share!


Saturday, April 4, 2015

Blackout Curtain Panels for the Nursery

Hello!  One of the advantages of working in a private Christian school is having a nice long Easter break.  I spent the first two days of my break working on curtains for the nursery.  This won't be a tutorial because I assembled these curtains in pretty much the same way as all the other curtains in my home.  I will put some links at the bottom of this post to other curtain posts I have done.

With the other curtains in my home I used cheap twin flat sheets as lining fabric but for these panels I used blackout fabric which will be important in the baby's room.  I don't like spending all the extra money but I know I will appreciate it when I am trying to put baby R to sleep when there is still daylight.  I also used multiple fabrics on the front side of the panel.  That just involved sewing some straight (ish) lines and pressing some seams, no big deal.

Here are the links to the fabrics I used:


I added grommets with a brass finish to the tops.  For the curtain rod I was inspired by these rods from Restoration Hardware:

I found a similar looking rod with crystal finials at Target and spray painted it with gold paint.  

I love these sweet curtains so much.  I was originally going to go with navy and white for the curtains but I am so glad I went for the bright color pop with the coral!

Click on the pictures below to read about my other diy curtains.

Monday, March 30, 2015

Chalkboard Globe

Hello folks!  It is time for another nursery update.  A while ago I came across an awesome chalkboard globe on Pinterest and I knew that I wanted to do the same thing in the nursery.  You can check out the detailed tutorial here from the blog, Blue i Style.  

I found my globe for $35 at a local store that sells only midcentury modern furniture and goods.  The rest of the supplies that I needed was sandpaper, two Behr latex sample paints in navy and coral, clear chalkboard paint, various art brushes, a gold oil based sharpie paint pen, and chalk.
I started by lightly sanding the globe just to give it a little grit for the paint to adhere to and then I cleaned it off before painting.
Next I painted all the water area with the navy paint using different sizes of brushes.
After 2 coats of the navy I started painting the land coral.  It took 3 coats.
I painted a third coat of the navy and then outlined all the land with the gold sharpie paint pen.  I forgot to take a picture of this step and the next two steps, oops.  I blame it on pregnancy brain!  Next I painted two coats of the clear chalkboard paint and after waiting a day I primed the surface by rubbing chalk all over it.

So there you have it.  It was an easy project but it took some patience and a steady hand.  I think it will be a cute addition to the vintage travel nursery! The fabric for the nursery curtains arrived last week so I am excited to get started on those over Easter break.  


Thursday, March 19, 2015

Pleated Crib Skirt

Hello!  I am back today with another nursery post.  A few weeks ago we decided to go ahead and purchase the crib.  I was torn between two cribs both made by Davinci.
This first crib is the classic Jenny Lind crib and it was the crib I envisioned from the beginning but then I saw this crib:
The Davinci Liberty crib has a classic spindle style as well.  The drawback of this crib was that it $150 more than the Jenny Lind so ultimately I decided that it wasn't worth that much extra money so I went with the Jenny Lind.  After assembling it and putting it in the room I was not disappointed.  It is beautiful, classic, simple, and has a wonderful vintage vibe.

Now that the crib was in the room, I decided it was time to get to work on the next major sewing project for the room: the crib skirt.  I figure that I want to get the big sewing projects out of the way before it gets too hard to get up and down from the floor.  I was inspired by this pleated crib skirt:
*One disclaimer about this post: this is not a tutorial.  I still consider myself a novice seamstress and there are far better tutorials out there but do feel free to use my ideas as inspiration.  

 I loved the simplicity of it and the pleats.  With the inspiration in mind, I got to work drawing up a plan.  I start by measuring the metal piece of the crib that holds the mattress.
I added a 1/2 inch seam allowance to the measurements of that piece.  I then measured the distance from the floor to the metal piece.  I decided that I wanted to put two 4" pleats in the long side pieces and 1 4" pleat in the short side pieces.  I added 8" inches for each pleat to the length plus a 1/2 inch seam allowance.

I decided to use white and navy fabric for the two contrasting fabrics.  The navy would be the bottom third of each piece so I calculated the height with 1/2 inch seam allowance for each piece.  I ended up needing 2 yards of the white and 1 yard each of the navy and muslin for the deck piece.  I chose a medium weight twill fabric for the white and navy fabric.  I also purchased some coral grosgrain ribbon to cover the seam between the navy and white fabric for each piece.  I bought thread in coral, navy and white.

The longest past of the this project was cutting all of the pieces.  One thing to note is that the long side pieces are longer than standard fabric width so I had to cut a of 4 pieces of each fabric to complete the long sides.  I calculated the length of each piece so that the seam would be hidden in one of the pleats.
My first step of sewing was to sew the pieces together for the long sides with a half inch seam.  I then pressed the seams flat.
Next I sewed the navy and white pieces together for each of the sides with a half inch seam and pressed the seams flat.
Next, I cut the coral ribbon into pieces that covered the seam between the navy and white fabric for each side.  I then top stitched the ribbon along the top and bottom edges.
After that I sewed the hem along the sides and bottom of each side.
My next step was to add the pleats.  This takes a bit a playing around in order to get it just the way you want it.  This was probably the hardest part of the whole project.  I got a little frustrated so took a break from the project for a couple of days.  It worked out in the end so no worries :)
Next I pinned the sides to the deck piece with right side together and sewed them together with a half inch seam then ironed the seams flat.

One step that I almost forgot was to tack the pleats down to help them lay flatter.  I didn't take a picture of this step, sorry!


I am satisfied with the final product.  It is definitely far from perfect but I think it looks lovely especially in person.  We don't have a mattress for the crib yet so I am sure it will look even more awesome when we have it all put together.  

That dresser in the first picture is an awesome antique store find.  It is a lovely 1950's dresser that we scored for $125 and it is the perfect size to use as a changing station. That sweet blanket on the crib was made by my husband's grandmother.  It was given to us several years ago for our first born and I just love it. 

I am in the middle of about 3 other projects for the nursery plus I also completed a little porch update recently so I will have many posts to share in the coming weeks!

Friday, March 6, 2015

Dr. Seuss Thing Maternity Shirt

March 2nd is Dr. Seuss' birthday and elementary schools around the country celebrate by participating in Read Across America Day.  Our school celebrates with a whole reading month which is kicked off by a week of fun dress up days for the students (and staff).  On the last day of the week the dress up theme is dress up like your favorite Dr. Seuss character.  In the past I have been a Thing and a Star-Bellied Sneech.  This year I decided to be a Thing again but I thought it would be fun to include baby in the fun.  This of course was a perfect project for my Silhouette Portrait so I opened up the software and got to work.  

 My medium of choice for this project was heat transfer vinyl.  I started by finding Thing 1 and Thing 2 images on Google and then I just dragged them to the desktop of my MacBook and then dragged them into the Silhouette software.  Then I opened the trace window and selected the image and clicked trace.

 After dragging the original image out of the way, I selected my traced image and selected release compound path from the object menu.  This allowed me to get rid of all the unwanted parts of the image.
I really just wanted the thing word and the number.

I put the shirt on to figure out what sizes to make the circles and then drew them in the Silhouette software.

I then copied the circles and made a smaller circle on the inside to create the border of the circle.  I also resized the "thing 1" and "thing 2" so that they would fit inside the borders.

Then I made sure to mirror the "thing 1" and "thing 2" since I was using heat transfer.  

I cut out the center circles out on white heat transfer vinyl and the rest of the shapes out on black glitter heat transfer.

I also cut out the inner circles on card stock so that I could make sure I got the placement right.  I found this read shirt at Target.  I love their v-neck tees because they are so soft and comfy.  They aren't maternity but I can still fit fine in a size large since I am only about 20 weeks.
I started by ironing on the white circles.  You need to make sure to put a piece of cotton cloth between the iron and the heat transfer.
Then I added the black borders.  I heated the white layer for about 20 seconds (with the cloth in between the iron and the heat transfer of course) before applying the second layer.  
I repeated this step with the "thing 1" and "thing 2" layer.  
It was so fun to wear this shirt at school today.  My favorite comment came out a conversation with some of my 1st grade students.  
1st Grader #1: Why are you Thing 1 and Thing 2?
Me: Well I am Thing 1 but who do you think Thing 2 is?
1st Grader #2: Your belly?
It was so funny!  They finally figured out that it was because I was pregnant which elicited my 2nd favorite comment of the day: Is it a real baby in your belly?  One of the best things about being an elementary music teacher is how entertaining the students are with what they say and do.  

Well I don't know what my next post will be yet but I am guessing it will be nursery related so hopefully it won't be too long before the next post!

Monday, March 2, 2015

Office Update

I've taken a little break from nursery stuff to work on a project that I decided wouldn't get done if it weren't done before baby comes.  We use the 3rd bedroom in our house as an office and I was sick of the purple wall color of the room.  I mean, I love the color purple but not this shade on all 4 walls of a small room.

I decided that a pale mint was the color that I envisioned for this room and after putting 6 different swatches (that looked remarkably similar) on the wall I decided on Behr Mint Fizz.  I am not disappointed in my choice at all but unfortunately none of my pictures do it justice.  Also painting the room made me aware of all the other things that I still want to do in this room.  So I decided to label the photos with some ideas that I have for the room.


Maybe these pics would have been better in daylight.  Oh well.  Just trust me that the wall color is a beautiful pale mint green.  By the way this small room has four doors, with 2 closet doors and a bathroom door in a addition to the main door!  They are all in the same area too.  If I had taken that last shot a little wider you could of seen all of them!  Just a random fact for you.

In nursery news, a few weeks ago I decided to tackle the 2 giant closets in the room.  There was a lot of stuff in those closets that didn't need to be in there.  In fact there was a lot of stuff that didn't need to be in our house period so this past weekend we took a massive load to the local charity thrift store for donation.  I have also been on the search for a dresser which was beginning to frustrate me.  I had this vision of a midcentury modern piece but finding something for under $150 that would make a good baby changing station and fit in the room was a challenge.  But I am happy to say that I found a lovely 1950's dresser that is absolutely perfect for $125 and I look forward to sharing pics once it is in the room.  We also ordered the crib and I will share that once we have it set up as well.  Now our job is to move the bed out of the room so that we have room for the crib which comes tomorrow!

I have a fun post on layering heat transfer material with the Silhouette for you guys for this coming weekend so you have something to look forward to!
Related Posts Plugin for WordPress, Blogger...