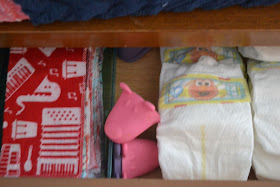
One of the reasons that I started blogging was to give others inspiration for projects just like I gain inspiration from other blogs. While this is not a diy or craft project ,I thought I would share it since I thought it might inspire someone else to try cloth diapering. I spent a lot of time researching cloth diapering before our daughter was born and I will post some links to the most helpful resources for me at the end of this post.
I started cloth diapers with Lyla about 3 weeks ago. I could of started earlier because she fit in them around 4 weeks but the first 6 weeks were a little overwhelming to me so I had to wait until I felt like I had everything else in control. Cloth diapering, as it turns out is really quite easy and the transition from disposable to cloth has been a breeze.
Type of Diapers
I decided to go with Bumgenius diapers for several reasons. First of all, they get good reviews overall and they look and feel like they are well-made. Secondly, they are easy to find and several places in town sale them. About half of our stash came from Amazon and the rest came from a local baby boutique and Buy Buy Baby.
There are several types of Bumgenius. We decided to buy the one size diapers in the 4.0 pocket diapers and Freetimes. The pocket ones are my favorite so far. One size diapers are nice because they have a series of snaps so that you can adjust the size of the diaper as your child grows. They are too big for most newborns so that is why we didn't start with them right away. They also make one size diapers with velcro but I imagine that the snaps will last a lot longer.
As you can see the pocket diaper consists of an insert and a cover with a pocket for the insert.
This is a Freetime, which is an AIO (all-in-one) diaper so the absorbent pieces are actually sewn to the cover. I also have one Elemental AIO which is very similar to the Freetime but the absorbent material is organic cotton instead of microfiber. They are much trimmer but take long time to dry.
I currently have 25 diapers in my stash. Since I like the pocket style the best, I have 18 of those.
The Diapering Process
Changing diapers with cloth is pretty much the same as changing disposable diapers at this point. Breastfed baby poop is water soluble so everything goes right in the diaper pail and straight into the wash from there. With the pocket diapers you also have to remove the pocket before you throw it in the diaper pail. That may seem like a gross task but I have a cool product that makes it a little less gross.
The are called diaper dawgs and they are little silicone things that slip over your fingers so you don't have to actually touch the insert. Everything goes in a stainless steel trash can that is lined with a waterproof liner.
 |
| Planet Wise Reusable Diaper Pail Liner |
You can also see in the picture above the cloth wipes that I made which I detailed in this post. I put about 12 wipes in a wipe warmer at a time and then put about a cup of water with a few drops of tea tree oil over the wipes to moisten them. The tea tree oil helps to keep the wipes fresh.
My daughter hasn't had much of a problem with diaper rash since I started using cloth diapers but it is important to note that most diaper rash creams should not be used with cloth diapers since they will interfere with the absorbency of the diapers. There are cloth diaper safe diaper rash solutions and this is the one I use:
 |
| Motherlove Diaper Rash and Thrush |
Laundering the Diapers
Laundering the diapers was the part of the cloth diapering process that I was most apprehensive about but it turns out that until she starts eating solid foods it is really a piece of cake. When the diaper pail is full, which is about every 3rd day, I take the liner out of the pail and dump the diapers in the washer and then throw in the liner as well (I have 2 of them). I throw in two scoops of this detergent:
 |
| Rockin' Green Classic Rock Unscented |
 |
| Whitmor Clip and Drip Hanger |
Above is a lovely staged picture of me stuffing a diaper. I actually have my nails painted for once. So this is completely off topic, but Essie Gel Setter Top Coat is my new favorite top coat. You can't tell from the picture but my nails are super shiny. I have done many activities since painting them which normally cause me to end up with chipped nails and there are no chips! But I digress, back to cloth diapering.
Other Miscellaneous Things
I carry one diaper with me in the diaper bag in case I need to change a diaper when we are out and about. When I plan to go somewhere where I know I'll be changing a diaper, I tend to put her in a Freetime because then I don't have to worry about unstuffing a diaper while we are out. I have this wet bag in my diaper bag for the diapers:
 |
| Planet Wise Wet Diaper Bag |
For out of town trips, we just use disposable diapers. When I go back to work in November, I will only be cloth diapering part time until summer since her daycare will only do disposable diapers.
The 4.0 pocket diapers came with newborn inserts as well as adjustable inserts. For nights I use a pocket diaper with a regular insert and one newborn insert since I don't change her diaper at all overnight. She doesn't sleep through the night yet but I try as hard as I can not to wake her up too much during her late night (well really early morning) feeding and changing her diaper would wake he up completely.
So far I have only had one leak over with cloth diapers and no blowouts. With disposables we usually had 1 to 2 blowouts a week so this has been nice so far.
Resources That I Found Helpful


