Monday, February 25, 2013

Recipe Art + Kitchen Updates and a DIY Fail


So I have a very simple DIY art project for you today.  I wanted to put up some art on this faux brick wall and I wanted it to be personal and fit well with the kitchen.  So I chose some family recipes with some meaning and opened up Microsoft Word.  In word I created a text box and then changed the fill color.  I went with oranges and pinks because those are the colors I will be using to accent the grey in here.  Then I used a bunch of fonts to type up the recipes.  Many of the fonts I used are free downloaded ones that are available all over the internet and Pinterest.   Then I bought 4 simple white frames, trimmed the papers to fit, popped them in the frames, and hung the frames on the wall.  Piece of cake!

The recipes that I chose have a special meaning to me.  Catherine's Cream of Tomato Soup was a recipe from a restaurant that we used to go with my dad's parents.  The owners knew us well and would always come out and talk to us when we came.  This soup is hands down my favorite tomato soup.  The next recipe I chose is my Grandma Charlotte's chocolate cake.  This is the cake that I have had for many family birthdays and it is so good.  I chose Norwegian Meatballs because of all the Norwegian heritage in this part of the country.  The last recipe I chose was Cowboy Caviar.  It is a dip that we have had on New Years Eve for many years and it has black-eyed peas in it which are supposed to bring good luck for the new year.

You may have noticed one of the other kitchen updates already. Yep that faux brick wall is now grey.  Remember this before?
I am so pleased with the way it turned out even though it was a beast to paint with all that texture and all those crevices.  It looks so modern and lovely now.  I also painted the wall with the door and above the window. 


The rest of that "lovely" peachy area is going to covered with the tile from this post.  I also replaced the outlet covers with these guys:
 
They are from Target and they match the white ones that are in the living room, dining room, guest bedroom, and master bedroom.  For some reason Target didn't carry the other type of outlet plates in- store so I have to order those online for the other wall.

Now for the diy fail.  Ok so I use a lot of herbs and spices in my cooking and my current storage of them wasn't working for me.  They were all shoved in a cabinet all willy nilly and I would either go through every spice just to find the one that I needed or I would think I was out of one and go buy another one at the store only to find out that I already had three of that kind.  True story, really, at one time I had 5 containers of ground ginger!  Ridiculous!  So the plan was to make a cool magnetic spice rack so I bought the supplies and pulled all of my spices out of the cabinet.


As you can see I am now down to three containers of ginger.  Well the magnetic spice rack ended up being a bust.  I decided to go with ceramic magnets instead of rare earth because I was worried about the proximity of my microwave to the spice rack.  I glued the magnet on the first jar and tried it out on the sheet metal and it worked so I preceded to glue magnets on the top of the other 23 jars.  Then before mounting the metal sheet on the wall I tested some to see and as soon as a I put a second one on the first one fell off.  Fail.  

It was an easy fix though.  I ordered two wall-mounted spice racks from Amazon and I think they look pretty nice.  The plan is to spray paint them black when it is finally warmer outside, gotta love North Dakota. I also will put some labels on the jars.  I like the look of all the jars instead of those ugly plastic containers. 


Now the plan is to paint the door.  I have already purchased the paint, Valspar Tangerine Cream.  Then I will be making a faux roman shade for the window and eventually the tiling will get done.  I love how the kitchen is coming together so far!


Sunday, February 10, 2013

Function Over Form: The Bonus Room Transformation


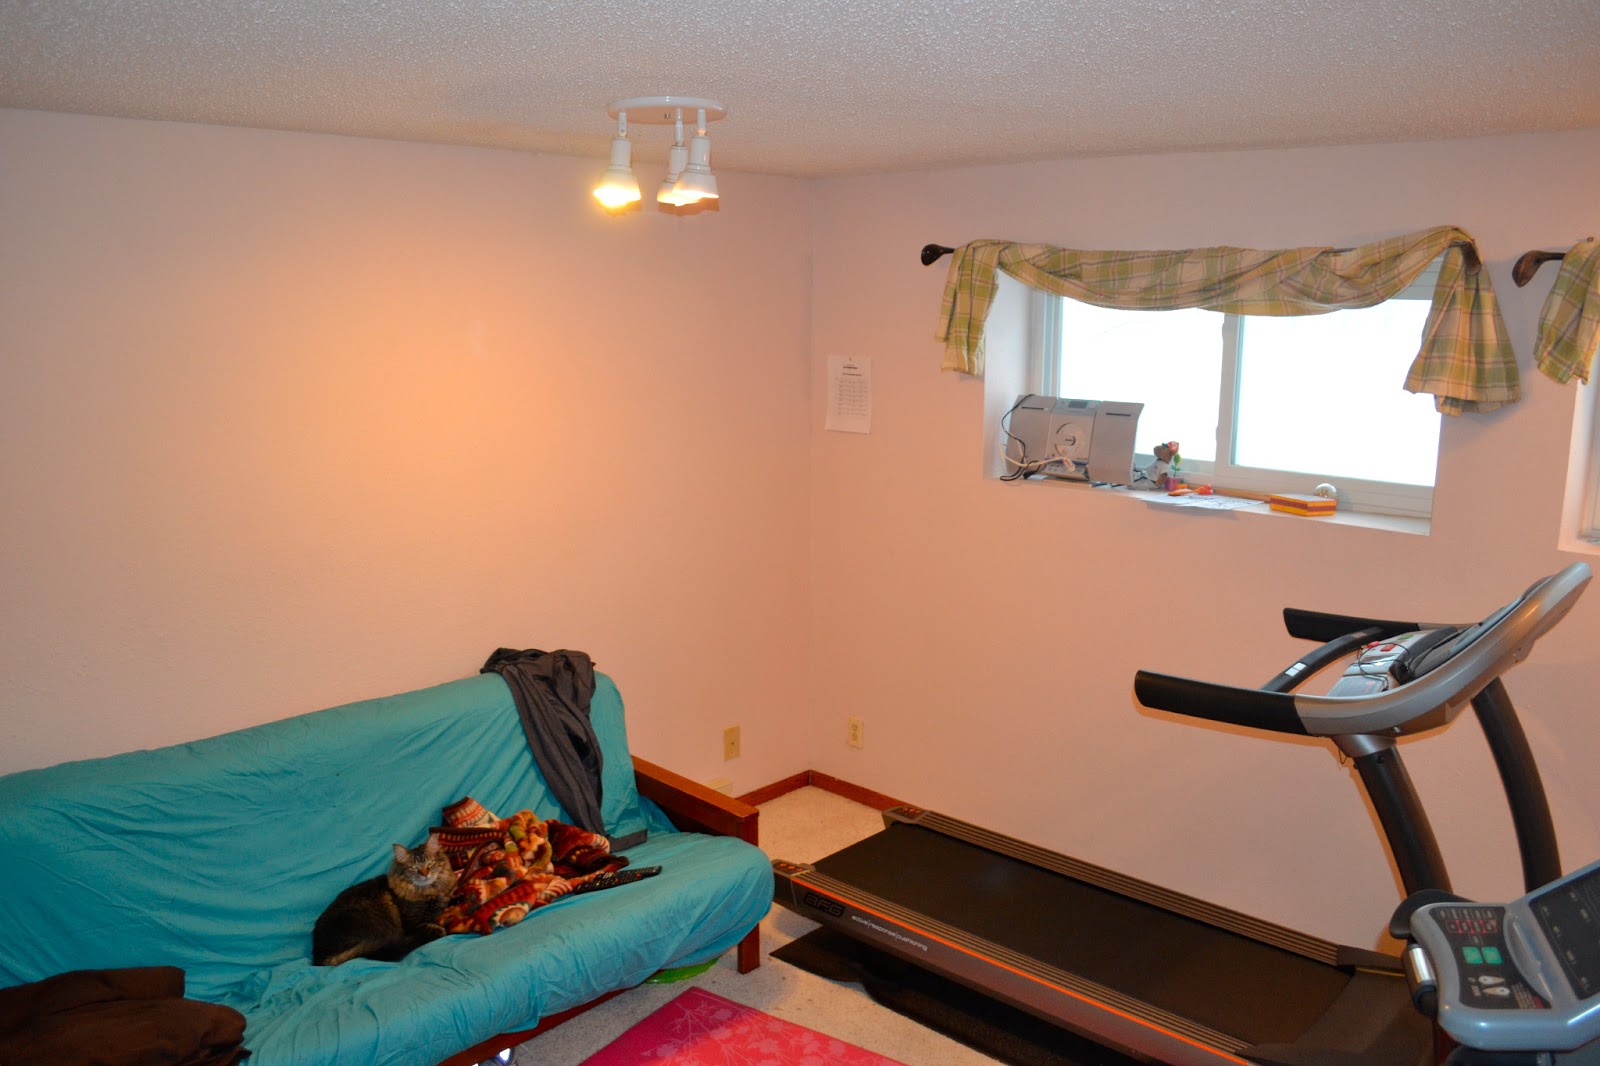
When we were looking for houses we were looking for 3 bedrooms.  We were lucky enough to find the house that we are in now which has a bonus room in addition to the 3 bedrooms.  You could call it a potential 4th bedroom but there is no door to close it off that would make it a bedroom.  When we moved in, the room was a blank slate:
Overall, I don't plan on doing much "decorating" in this room.  I like the wall color because it is a nice subtle neutral and nicer than just plain white walls.  The window treatments were left by the previous owner and I like them for now because they are kind of funky.  The curtain rods are old golf clubs!  When we moved in, this room housed all the boxes that we didn't want to deal with unpacking yet but my husband and I had some big plans for the room.

We are both runners and we knew that someday we would like to own a treadmill.  I have a YMCA membership and John has a work-out facility at his work but training for marathons and half marathons requires hours on the treadmill in the winter and work-out facilities are often crowded in January and February.  Neither of us are brave enough to run outside in the North Dakota winter.  I don't mind the cold (partly because I love my cute cold weather running gear:) but the ice and snow makes me nervous about falling and injuring myself.  It is funny because the treadmill was one of our down-the-line big purchases.  But when we got to thinking about it, it is something that we really wanted and so we took the plunge.

And it was definitely a plunge because runners need a good treadmill and the cost runs high for a quality one.  We do not regret the purchase at all because since we got it in December we have already put at least 100 miles on it.
We also have a very nice exercise bike that John purchased when he lived in his last apartment.  I bought John a bluray player for Christmas and then we used part of John's Christmas bonus to buy a nice HD TV which we wall-mounted.  The bluray player is nice for working out because it has built in wi-fi so we can watch Netflix, listen to Pandora, or stream work-out videos from YouTube.  I can also watch my Pilates and Jillian Michaels videos for my strength and cross training days.

My futon also found a home down here so that we can watch movies and enjoy TV.  It is the only TV in the house that gets PBS so I watch Downton Abbey down here (we don't have cable, only antenna).  It can also double as an extra guest room with the futon.  My futon has a nice mattress with springs in it so it is actually pretty comfortable.

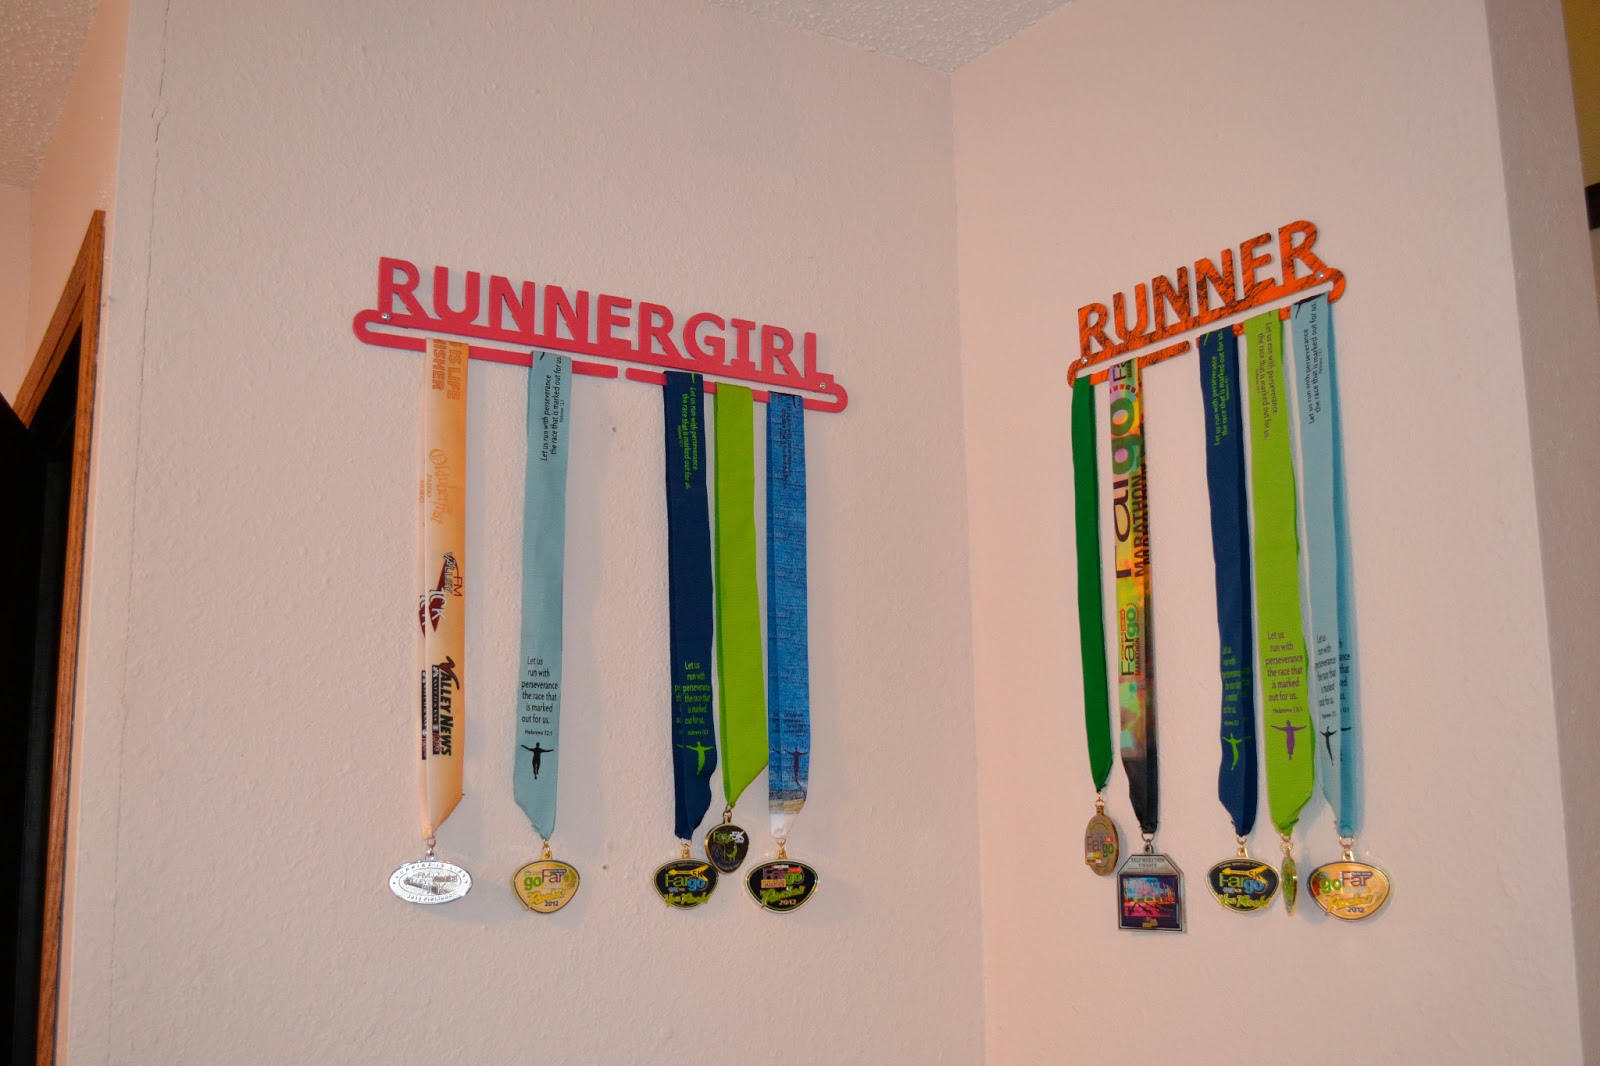
I plan on making some inspirational word art for the walls down here since the room's main function is as an exercise room.  Today we added some medal hangers to the walls so that we can display the medals that we get from races.  We got these medal hangers at the Fargo Marathon expo last year from a local vendor.  They are pretty cute and I can't wait to fill it full of medals.  I will have 3 more by the July as I am running the Get Lucky 7K in Minneapolis next month, the Mickelson Trail Half Marathon in Deadwood South Dakota in the beginning of June, and the Run or Dye 5K in Fargo at the end of June.  No Fargo Marathon events for me this year though because I am bridesmaid in my friend's wedding which is on marathon weekend.

Sunday, January 27, 2013

50 Shades of Grey


Okay so this blog post has nothing to do with the recent obsession of women with that book series 50 Shades of Grey.  In fact I have never read any of the books and don't plan on doing so ever.  But I do have to confess a big obsession of mine...my obsession with the COLOR grey.  I just cannot get enough of it.  It is the perfect neutral.  It can be cool, it can be warm, it can have undertones of pretty much every color.  It makes brightly colored decor pop.  So naturally this obsession has shown up in my house frequently.

My dining room is painted with a moody grey called City Storm by Valspar.  It makes my dining look elegant and modern.  Just this week, I purchased a tile for my kitchen back splash that is of course grey.  I think it will look awesome with a white grout and the pattern ties in nicely with the stencil pattern on the dining room walls.
I picked out a beautiful grey with green undertones for our bedroom called Washboard by Ralph Lauren.

And I have just finished painting the guest bed room a beautiful warm grey called Sparrow from Behr.  I think it looks beautiful with the Tiffany blue damask bedspread I have on the guest bed.  Now I just need some more furniture for the room because currently it is very bare.


Phew...I feel so much better now that I have made that confession to all of you.  It isn't a bad thing to be obsessed with right?;)

Saturday, December 22, 2012

Fa la la Food!


Another thing I love about Christmas time is baking.  I love to experiment and make new things.  I also like to bake for my students.  My 4th and 5th grade choir sang You're a Mean One Mr. Grinch this year, so when I saw these cute Grinch cookies on Pinterest, I had to make them.  I got the recipe from this blog.  Here is the recipe:

Grinch Cookies

  • 1 18.25 oz box French vanilla cake mix (I just used white cake mix)
  • 6 T butter
  • 2 eggs
  • Green food coloring
  • 1 c. powdered sugar
  • 1 t corn starch
Directions:
Preheat the oven to 375°. Melt the butter and set aside to cool. In a shallow dish, mix together the powdered sugar and cornstarch with a fork. In a large bowl, mix together the cooled butter, cake mix and eggs. This will be a little hard to stir together. Add the green food coloring and make sure it is all mixed in.

Take two spoons and drop a blob of dough in the powdered sugar. Move it around with spoon until it is mostly covered in powdered sugar. Then, once it is already covered, roll it into a ball and place it on a cookie sheet.

Make sure you don't over crowd the baking sheet because these cookies spread out.

Bake them for 8-9 minutes.   They will look slightly puffed up.

Take them out of the oven and cool for one minute. Then move onto a cooling rack. They will drop a little, but will still be nice and chewy.


I also made a batch using red velvet cake mix for my piano studio's recital but I forgot to take a picture.  They tasted awesome!  My husband took the leftovers to work the next day and they got rave reviews from his coworkers.


 I also made cake pops for my piano studio's recital.  I have never wanted to make these before because the traditional method of making them uses frosting to hold together crumbled up cake.  I do not like most kinds of frosting so these didn't sound appetizing.  Lately, several companies have made devices and pans for making these by just baking cake in a round shape.  I used the Nordicware cake pop pan that I purchased it at Target for mine.
I used the recipe on the package.  The recipe created brownie like cake that was very dense and rich.  Here it is:
Fudgy Cake Pops

  •   3/4 cup semi-sweet chocolate chips
  • 1/2 cup butter
  • 3/4 cup sugar
  • 3 Tbsp cocoa
  • 2 eggs
  • 3/4 cup flour
  • 1/4 tsp salt
  • 24 lollipop sticks
  • 1 package chocolate bark coating (I also used regular white almond bark)
  • assorted sprinkles (I used colored sugar) 
Heat oven to 325 degrees.  Grease pan and set aside.  In medium saucepan, over low heat, melt chocolate chips and butter together; stir until smooth.  Remove from heat and pour into medium bowl.  Add sugar and cocoa; mix until blended.  Add eggs, one at a time, mixing well after each addition.  Add flour and salt; stir until blended.  Spoon batter into bottom half of pan (without holes) filling each well so it mounds over the top of the pan.  Place top half of pan on top and secure with keys.  Bake for 20-25 minutes, until toothpick inserted comes out almost clean.  Cool 5 minutes in pan, remove cake pops from pan to cool completely.  Melt chocolate bark according to package directions.  Insert lollipop sticks into cakes.  Dip cake pops in melted chocolate, spinning to let excess chocolate rip off.  Decorate with sprinkles as desired.  Place on parchment paper to set.  Makes about 24 cake pops.

I also decorated some by dipping them in the white almond bark and then drizzling some of the chocolate bark over it.  I let them dry by sticking the stick end into a block of floral foam.  I displayed them at the piano recital in some parfait glasses that I picked up at a thrift store.  The sticks were shorter than I thought so I filled the parfait glasses with some coffee beans then stuck the pops in.  They turned out so cute and they were a big hit with my piano students and their siblings.


Sunday, December 16, 2012

Deck the Halls


I really love Christmas.  It is a busy time of year especially for a music teacher at a Christian school but I still love it.  This year I was really excited to decorate our new house for Christmas.  Most of the stuff that I decorated with I had on hand.  I did buy some sweet apothecary jars at T.J. Maxx.  I love that they can be changed up for any season by what you put inside them.
The larger one is holding some natural looking objects.  Not blatantly Christmasy but goes well with the other two.


 I love the pattern on the one with the candy canes.  I was going to put pine cones in the other one but I decided to trim add some trimmed branches from the Christmas tree instead.

Next I decorated the piano.  I swapped out the candles for gold candles, added a few fake branches around the lamp, and filled a vase with mini ornaments and fake berry branches.


Oh and that little snowman guy was a present from a student a few years ago.  He is kind of cheesy but my piano students enjoy pressing the button and making him play.

Next I filled a few more vases with fake snow and mini ornaments.  I have a lot of these cylinder vases because they are from the centerpieces that I made for my wedding.  They were filled with paper dogwood branches that I made.

I also set up a creche on the bookshelf across from the piano.  This is the one that I had growing up.  I bought some ceramic tealight holders at Target.  They are cute when lit up because one has the three wise men and the camels and the other has a nativity scene.

Last year during our city's spring cleaning week, we decided to set my thrift store artificial tree out on the curb.  We always had real trees at my house when I was growing up.  It turns out that using real trees is a more environmentally concious choice than using fake ones.  Also, my cat likes to eat trees and he gnawed on the fake one constantly (and climbed it).  I worry about him ingesting plastic so I would rather he eat actual pine needles.  We picked up this beauty on an extremely cold day in Fargo from a Boy Scout troop.  


I have also been enjoying some holiday baking and I should have a post on that soon as well.  


Tuesday, December 4, 2012

The Almost Perfect Crime...and Other Stuff


Above is our lovely Christmas card photo.  I am pretty happy with how it turned out this year!  

So the time period between Thanksgiving and New Years is a time that I feel motivated to do many thing but then I realize that I have started all these projects and suddenly it is December and things get crazy busy for me.  I'm an elementary music teacher and I have a ton of performances during the first three weeks of December.  So all those projects that get started over Thanksgiving break tend to be suspended until all the madness has ended. 

Now on to the almost perfect crime.  Said almost perfect crime was committed by the handsome guy in the photo above.  My husband decided to get an astro start put in my car as my Christmas present.  If you don't live in a place where the winters get really cold, then you may not understand why this is so exciting to me.  When there is a -30 degree wind chill outside, a remote starter is the best thing in the world.  My last car would die in that sort of weather without being started several time in a day.  That meant that I had to go outside in said weather several times a day to start my car, let it run, and then go back out to shut it off.  Now I can just push a button, hallelujah!

This gift was supposed to a surprise for Christmas and my husband almost pulled it off.  He came to the school that I teach at over his lunch break and took my car to the place to have it installed.  I had been considered going to the grocery store over my lunch break to stock up my mini fridge at work.  But...I discovered it was foot long hot dog day in the school cafeteria so I decided to just eat that.  

Normally the key that he has for my car sets of the alarm.  But...I forgot to lock my doors that morning when I got to school.  Also, I normally leave early on Mondays because I teach piano lessons at my home.  But...an emergency staff meeting was called so I ended up staying an hour later than I normally would have.  It was perfect...except...he left the manual for the remote on the passenger seat of my car.  His reaction when I handed it to him...Well shoot!  Love it!  

Hopefully soon I will have posts (full of pictures) for these projects: painted guest bedroom (no longer bright green), homemade Christmas gifts for my little sisters, and decorating for a Christmas piano recital.  As my college band director would say, "stay tuned."

Oh and now I am going to watch this while I write a letter to go with my Christmas cards:
I should have this up in my classroom!


Saturday, November 3, 2012

DIY Lined Curtains

 Over the past two weeks, I have been working on curtains for our living room.  My husband was (mostly jokingly) complaining about the lack of curtains in the living room and dining room.  We ended up getting the previous owners to leave all window treatments for us which was really nice in the case of the blinds in the office and the beautiful Roman shades in the full bath.  Most of the curtains in the house, however, were not my taste and did not go with the new paint colors on the walls.  I do like the curtain rods in the living room so I put those back up after painting.

Anyway, back to making curtains.  I ordered the fabric from fabric.com because I couldn't find anything I liked at the local fabric stores.  I followed this awesome tutorial from House of Hepworths pretty much to a t.  By the way, the fabric that she uses on her curtains is amazing and they sell it at fabric.com as well. 

The cat decided to "help" with the process of making curtains.  Needless to say, he got locked in the basement for most of the time I was working on these.


I began by measuring the length for the panels and added some extra length at the bottom to account for seams and such.  I decided I wanted two panels on each window even though the windows are rather narrow.  I like being able to push them to the side instead of using a tie-back.  There was a lot of prep work involved in the process before the actual sewing happened but it was fun.
There was a lot of ironing.  I broke our ironing board while working on the bookshelf project so I am using an ironing pad on our dining room table.

Add caption

Ironing the lining.  I used cheap twin flat sheets just like in the tutorial.


Pinning the lining underneath

Trimming the excess lining.  I didn't follow the tutorial exactly here.  She pinned the top and opposite side and then sewed those before trimming and pinning the other side.  I trimmed and pinned the other side and then sewed the whole thing all at once.
Finally sewing!
After I finished these steps on all six curtain panels, I hung them and pinned them up to the length I needed them to be.  In the tutorial, she left them up and hand sewed the hem.  I took mine down because I had quite a bit of excess at the bottom and I am not the greatest hand sewer.  I trimmed a bunch of excess from the bottom then sewed the hems on the sewing machine.

They turned out great and I am so thankful that there are so many great tutorials like this one out there.


Now I am eager to find some fabric for the dining room curtains.  But I also need to find rods for the dining room because Roman shades were the previous window treatment.


Related Posts Plugin for WordPress, Blogger...