Tuesday, August 12, 2014

What I've Been Up To Lately

Warning: This is going to be a super random post with a bunch of unedited photos.  Definitely not my usual kind of post.

So it has been quite awhile since I last posted.  I've been busy...but not with house projects (but I do have a few little projects to share in this post).  At the end of July I went on a trip with my parents and siblings that we take every year to visit our relatives in the Southern Midwest.
I was born and spent the first 7 years of my life in Tulsa, Oklahoma.  I still have quite a few relatives living in the area including grandparents.  It is always fun to go back and visit.

One of the coolest places in Tulsa is the Philbrook Museum of Art.  This beautiful mansion was turned into a great museum.  One of the best parts of the museum is the gardens.  Last year the gardens were closed because of a big storm so we came back this year to just visit the gardens.

This year we added some different sites to our trip with a little detour into Arkansas and Missouri. The above picture is of the War Eagle Mill in Arkansas.  It is a beautiful place.

Later we travelled to Branson, MO and visited Silver Dollar City.  It is a theme park with lots of rides and some old time craftsman and artisans.  I got a chance to take some artsy photos with my iPhone.  

I also took some time to meditate, haha.

Music nerd alert!  One of the highlights of the trip for me was buying this mountain dulcimer at Silver Dollar City.  Buying an authentic folk instrument in the Ozark Mountains is super exciting to a Kodaly trained elementary music teacher.  I can't wait to play it for my students.

After Branson we went to Kansas City and watched the Royals play the Twins.  I am fans of both teams so it was hard to pick who I wanted to win.  I went with the Royals for this one since I was on their home turf.
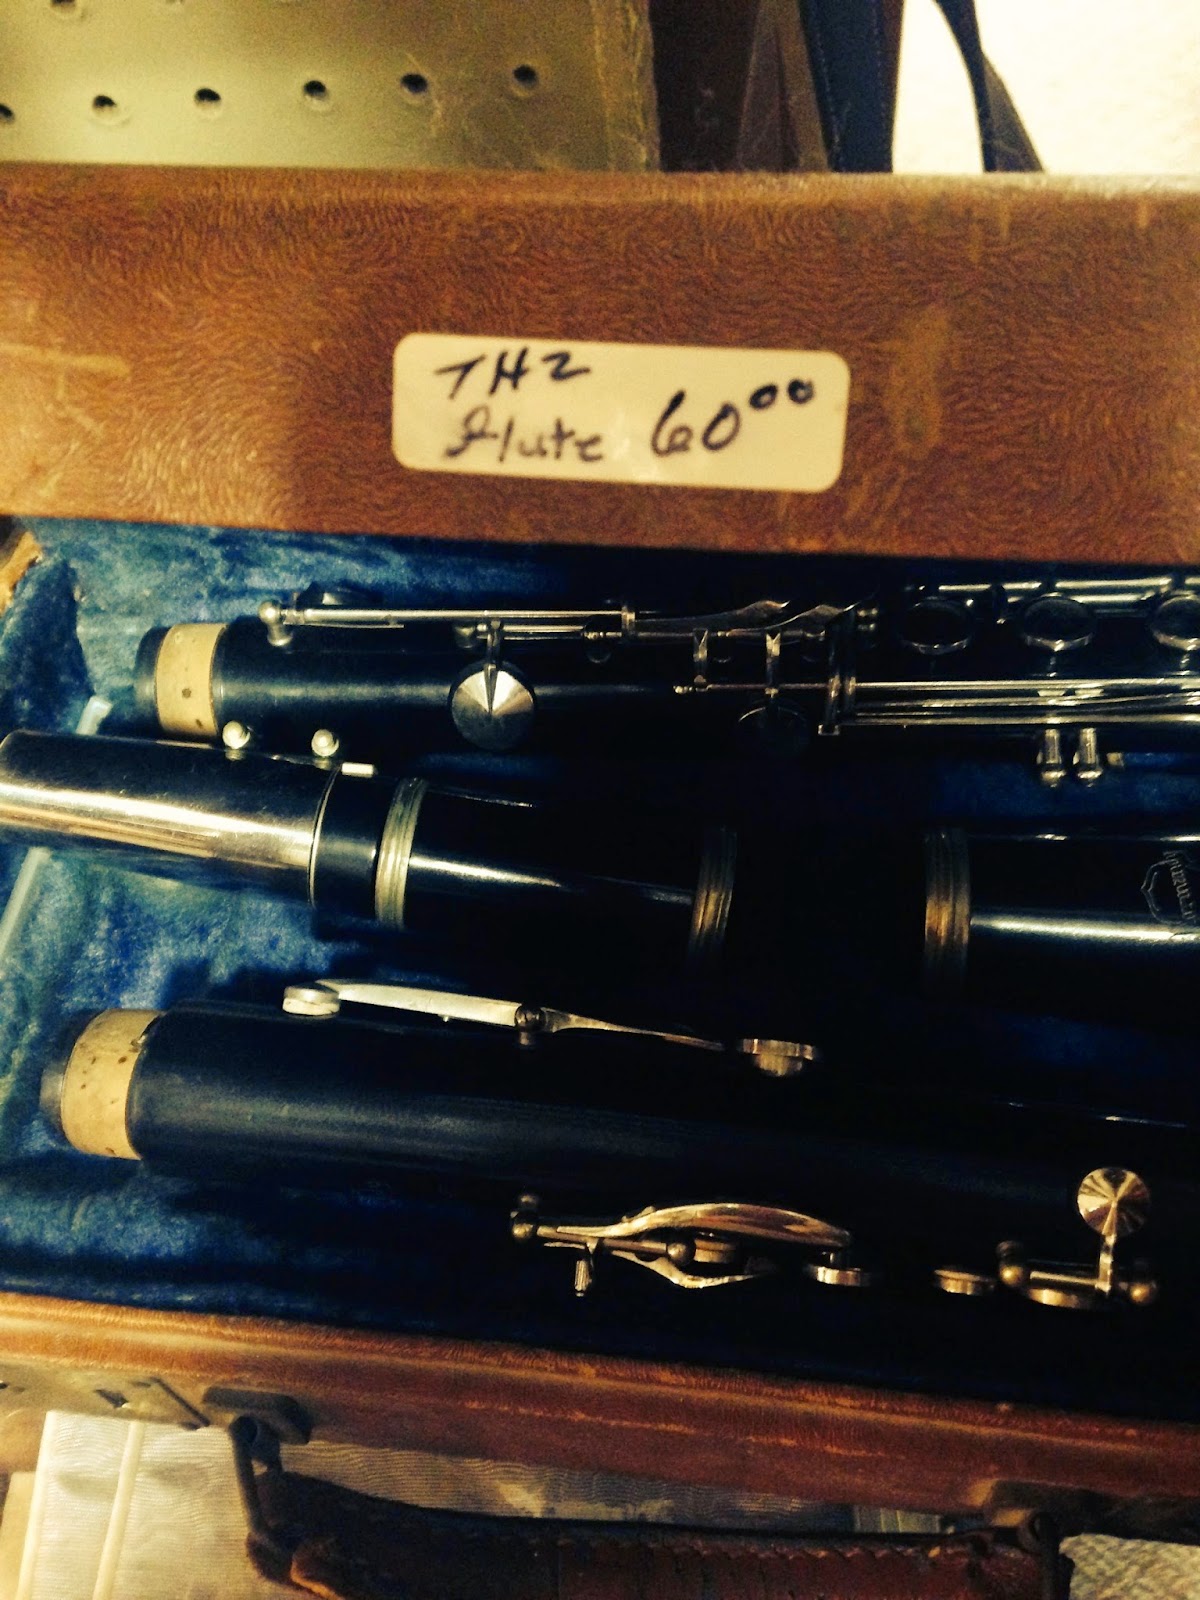
Shopping at antique stores has been a part of our trips for the last few years since my dad started collecting antique oil cans.  I love to shop at antique stores and it is always fun to see what funny things you can find like this lovely "flute."  I did pick up a few items for myself including this silver plated pitcher.

When I came back from the trip my living room featured not one but two couches. I should of taken a picture but I didn't, wah wah.
Our old couch was just way too big for the space.  The chaise lounge piece cut off the flow from the living room to the stairs and addition.  So we decided to downsize.

The living room looks so much bigger now!  We even have room for another chair or 2 now. I am really happy with our decision to downsize.  That old couch, while comfortable, just didn't fit the space.

Since I've been back I have been super busy with getting my classroom ready for the school year. It is hard to believe that it is so close to starting already.  I know this is a blog about my home but I want to share some of my school projects anyway.

My first project was to reorganize my teaching material binders and make some cute binder covers and spines.  I used Pixelmator which is a Mac program similar to Photoshop.  I use this program to edit all my photos for this blog too.  I would love to have Photoshop but it is so darn expensive.  This program has many of the same features but is much, much cheaper.

I also used the program to make some new hall passes.  I love owls and there are lots of them in my classroom.

I've also been working on some file folder games that I bought on Teachers Pay Teachers for music centers.  I made the envelopes that will hold the "game" pieces with my Silhouette.
This spring I had a parent who was doing work study hours cut out and laminate some rhythm manipulatives for me.  For some reason the half notes didn't get laminated so I laminated them and have been sorting them into bags.

Before I left for our trip in July, I completed some small projects in our home office.  I found some cute houndstooth wrapping paper at HomeGoods and decided to mod podge it on to the magazine holders that contain my Better Homes and Gardens magazine collection.  I also made some labels with adhesive vinyl and my Silhouette for the shoe box containers in my craft closet.

Phew, that was a long one.  Once school gets started I hope to have some time again to do some house projects.  I do have a baby shower and wedding coming up in the next few weeks so I might have some more homemade gifts to post about in the nearish future.  


Saturday, July 19, 2014

Blog Refresh + S'mores Trifle

Who else is loving all the videos for the new Weird Al album.  The man never seems to age and his song parodies crack me up.  Last weekend I was on a trip and my husband and I were listening to the 90's alternative rock station on Sirius XM.  A Nirvana song came on and my husband commented on how he is so tired of Nirvana songs.  I liked listening to it however because it made me think of Weird Al's parody "Smells Like Nirvana."  That is when I got the idea for a new Sirius station that would play songs and then it would play the Weird Al parody of the song right after.  Genius idea, right?  Anyway, I've decided that "Handy" (a parody of Iggy Azalea's "Fancy) is going to be my new blog theme song.


Now that my blog has a theme song, let's talk about some changes that you may have noticed on the blog recently if you are a frequent visitor.  Before I decided that I wanted to be a music teacher, I was a landscape architecture major in college.  It was a five year program at my university and I made it through 2 and half years before I decided it wasn't what I wanted to do with the rest of my life. I was going through some things in the office the other day and found this drawing that I did when I was in the program.
I considered art, graphic design, and interior design when switching but ultimately decided on music education.  I don't regret my decision at all as I love my job but I do miss some things about the design field.  That is part of the reason that I started this blog.  All of the projects that I do satisfy my need to be creative.  This blog also allows me to work with photo editing software and get a change to do a little graphic design.  

I knew that my blog needed to be more unique and I thought that creating a custom header would be the perfect way to do this.  I started by creating a water color painting of my house.  
The great thing about this is that I can frame it and have some cute art for my house too.  Next I went into my photo editing software so that I could design a graphic for my blog title.  I have lots of experience with Photoshop but unfortunately I can't afford it at this time so I have been using a Mac program called Pixelmator.  I wanted to incorporate the little house around the word house because I knew that I could translate that into a graphic for my photos too.

I chose grey and teal as the colors because of our grey siding and teal door.  To make the header I just open up a canvas the size of my blogs header and laid out my text, house graphic, and house painting. To add my header to my blog I just went to the blog layout section of the Blogger dashboard and clicked on edit header.  A dialogue box pops up and then you can choose to add a photo and you can choose to use your photo instead of the blog title and description.

I am really happy with my new blog look.  Well if you read (or skimmed) all of that because you were intrigued by the S'mores Trifle recipe then you will be happy to know that we are almost there.  My birthday is this Sunday and last night I had a get together at my house to celebrate with friends.  In my usual fashion I made a ton of food.  I decided a taco salad bar would be fun since I have those perfect tortilla bowl things.  They are awesome by the way.  I made three types of meat, two types of salsa, guacamole, corn salad, and a dessert.  Trifle is one of my favorite desserts to make for parties because they look so pretty and fancy, there are tons of flavor combinations, they are so easy to make, and they are delicious. Here are a few of the trifles I have made in the past:

Strawberry Cheesecake Trifle
Red Velvet Trifle
Ever since Dairy Queen's S'mores Blizzard I have been obsessed with all things S'mores.  After looking at various s'mores trifle recipes on Pinterest I came up with my own.


So without further ado, here is my recipe for S'mores Trifle:
S'mores Trifle
  • chocolate cake-I used a box cake but you can make it from scratch too-I used about half the cake
  • instant chocolate pudding (1 to 2 boxes depending on how much pudding you want)
  • graham crackers-I used one sleeve, so about 9 crackers
  • 1 container Cool Whip or homemade whipped cream
  • Mini marshmallows
Directions: To assemble break the cake into pieces and put half of the cake in the bottom of the trifle bowl.  Put half of the chocolate pudding on top of the cake layer.  Break the graham crackers into pieces and completely cover the pudding layer with half the graham cracker pieces. Put half of the Cool Whip or whipped cream over the graham crackers.  Then layer some mini marshmallows over the whipped cream.  I put a single layer of the marshmallows on a cookie sheet and stuck them under the broiler for a little bit.  This does not take long so don't walk away. As soon as they start to brown take them out of the oven.  I stuck the pan in the freezer after so that they would set up enough for me to remove with a spatula.  Repeat all the layers with your remaining ingredients.  For the top layer of marshmallows you could repeat the broiler step or you can use a kitchen torch to char the marshmallows.  I liked using the kitchen torch on the top layer because I like the blackened look of the marshmallows.  Place the trifle in the fridge and chill for a few hours before serving.

This trifle is so good.  The taste of the charred marshmallows was perfect and really evoked that S'mores flavor.  Next week I will have some more office projects to share with you.  Until then feel free to leave a comment and let me know what you think of today's post!


Wednesday, July 16, 2014

Heat Transfer Monograms

I love to make things for people just as much as I love making things for my home.  My Silhouette Portrait has opened up so many possibilities for making gifts for people.  One great thing about the Silhouette is its ability to cut heat transfer vinyl.  In January my friend had a baby boy.  We were at lunch one day and she was talking about her son's nursery and how she would like to find some grey and white chevron curtains.  Since I have already made many curtains for my home I knew that I could easily make some for her.
I made them shorter than normal because of a baseboard heater on that wall.  I had also been wanting to try making a valence so I made one to surprise her with.  I used this tutorial from the Living Solutions Interior Design Blog.  I did not staple it to a piece of wood which is the traditional way to make a valence.  Instead I used a simple metal curtain rod like this one:
I made a little sleeve of fabric that I sewed velcro to and slid the rod in.  Then I sewed velcro at the top of the valence.  That way the valence is removable for washing if necessary.  I hope that makes sense since I didn't take any process photos.  I hope to make another one eventually and then I will do a full tutorial.  

After I finished the valence I knew that it needed a little something more so I decided to add a monogram with heat transfer vinyl.  I just used a monogram from the Silhouette online store.
It turned out so cute but for my next monogram project I knew that I wanted to step it up a little bit by making a custom monogram.  Last weekend I attended a wedding and I wanted to give the couple something handmade in addition to some items off of their registry.  I knew that monogrammed napkins would be the perfect thing.  I made napkins for my own home in this post.
So I chose some cute navy and white greek key fabric and decided that orange thread and an orange monogram would look sharp.  After googling images of monograms to get some ideas I opened up my Silhouette software and picked a font.
I chose Niagra Engraved.  A monogram for a married couple starts with the first name initial of the bride, then the last name initial of the groom, followed by the first name initial of the groom.  
I then changed the fill color to orange to help me better visualize what the monogram would look like on my napkins.
I found a flourish frame that I like in the Silhouette online store.  I knew that I needed to make a few modifications to get it the way I wanted it so I used the knife tool to separate the top from the bottom and deleted the bottom part.
The shape still had some extra edges so I double clicked on the shape so that I could edit the points.  I dragged and deleted points until the line was straight.

I then filled in the shape with orange, copied the shape, and flipped it 180 degrees and placed the shape above and below the monogram.
I then went to the object drop down menu and found the fill page command under the replicate menu to make a page of my monograms.
Finally I mirrored the image horizontally.  This is an essential step when using the heat transfer material otherwise you will have a backwards design on your finished project.  I loaded the heat transfer material into the Silhouette and sent the design to the Silhouette using the heat transfer settings.  Then I weeded out my design and followed the directions on the box to apply the monogram to my napkins.


So there you have it, a heat transfer monogram tutorial.  It is a really easy way to customize any fabric project.  And the heat transfer material comes in two finishes: smooth like I used in these projects and flocked which is fuzzy.  I hope you have an awesome day and feel free to leave me a comment below!

Friday, July 11, 2014

Closet Fabric Storage

I am back today with a quick post about my new fabric storage solution for my closet.  Last week, I wrote a post about my Sterilite storage drawers which I made a little prettier by adding patterned cardstock and chalkboard inspired labels.

When I originally shared my closet makeover in January I had found a nice solution for my scraps by storing them in a shoe organizer but my large yards of fabric were just piled on the floor of the closet.
This made it a little hard to see what I had and also looked messy. After looking at different ideas on Pinterest I decided that the best solution for me would be to install some closet rods underneath the bottom shelves on the side of the closet and hang the fabric.

The sides of the closet are pretty narrow so I had to find some hangers with clips that were small enough to fit in this space.  I found these baby hangers at Bed Bath and Beyond.  They were $3.49 for a 3 pack.  I got a ton thinking that I would have quite a few extras.  Turns out that I have a lot of fabric and I only had one pack left over in the end!
Here is a picture of my lovely knit collection.  I am excited to turn that Navajo print into some cute leggings for fall and winter.  I love the way this turned out because not only do I have easier access to the fabrics but I can also easily see them.  Hopefully this will motivate me to complete more sewing projects.  I am especially excited because my husband got me a serger for my birthday (which actually is still a week and half away but he will be gone on a work trip then).
I will be back next week to talk about my blog refresh and I may have another office project to blog about too.  Have a great weekend!
Related Posts Plugin for WordPress, Blogger...