Pages

Monday, May 25, 2015

Sewing for Baby: Car Seat Canopy

Hello Everyone!  I am back today with the second installment in the Sewing for Baby series.  Today I am posting about sewing your own car seat canopy.  There are no shortage of tutorials out there for this project and my post today is not another tutorial.  Today I am just sharing with you what tutorial I used and how the project went for me.  After looking through many tutorials I finally decided to follow this tutorial from The Ribbon Retreat Blog.  The pictures were good and the instructions were clear.  The blogger even added cute bows and ric rac to her canopy.  I decided to make mine a little simpler and leave out the bows and ric rac.  I chose to make mine with cotton fabric on the top side and minky fabric on the underside.
Minky Cuddle Embossed Chevron Charcoal from Fabric.com
I purchased the top side fabric from Joann Fabrics.

Since this isn't a tutorial I didn't take many pics of the process but here are a few that I did take.
All of our casual plates are square so I had to use one of our fine china plates for the curves!
I laid the cotton fabric right side together on the minky and then cut out the minky that way and pinned.

For the straps I decided to use snaps instead of velcro.  The snaps and snap tool that I used are from the Kam Snaps company.  This was the hardest part of the whole project since I had never worked with snaps before.  Once I figured it out, however, it was really easy.

This whole project took me just a few hours in a day.  It was really simple and the project was also relatively inexpensive so I would definitely recommend making your own as opposed to buying one.


I hope you enjoyed installment #2 in this series.  Yesterday I completed installment #3 so I should be ready to post that one in the near future.  I have also been busy with several nursery projects and I may have a recipe post for you as well soon.  Keep checking back for more posts!

Friday, May 15, 2015

Framed 3D Monogram

My little one's room is quickly becoming one of my favorite rooms in our house.  In fact I think that it is pretty much tied with the porch as my favorite.  I am proud of what I have done in all the rooms in our house but this one is really something else.  And it isn't even finished yet!  As you can see from the picture above, this part of the room is getting close to being finished.  If you are curious about the baskets with the cloth diapers you will have to wait because today's post is about the framed monogram (if you couldn't guess by the title).  Thanks Captain Obvious ;)
I found the frame and letters at Hobby Lobby and the fabric is a Cotton + Steel print called Tokyo Train Ride.  I purchased it at our local fabric store Modern Textiles.  I started by measuring the inside of the frame and cutting a piece of foam core board to those dimensions.  I then used Mod Podge to attach the fabric to the foam core.
 
I put the fabric foam core piece in the frame and just used packing tape to lightly hold it in the frame.  
I spray painted the letters with the same gold paint that I used on the curtain rod and the lamp.  
Next I placed the letters on the fabric and then traced them with a fabric marking pencil.  Then I measured where the hanging holes were on the letters and marked those spots with an x on the fabric. I hung the frame on the wall using a french cleat.  I like this type of picture hanging hardware because it really makes the picture flush with the wall.  I used a french cleat to hang the watercolor skyline in the living room for the same reason. 
I then hammered nails into the spots that I marked on the fabric.  They went straight through to the wall which is okay because it gives the frame added stability.  Sorry for the blurry photo!
Then I hung the letters on the nails easy peasy.
This was a really simple project.  The hardest part was dealing with drilling holes in the plaster wall for the french cleat.  Plaster walls can be frustrating sometimes but I still love my 1927 house! Next up on the blog will be another installment of my new blog series, Sewing for Baby.  You can check out the first post in the series on cloth wipes here.

Monday, May 11, 2015

Sewing for Baby: Cloth Wipes

I have a nice quick post for you all tonight. It is the first in a new series that I have titled Sewing for Baby.  I have had my sewing machine for about 3 years now and I am proud of all that I have accomplished with it.  I don't consider my self a professional seamstress by any means but I definitely think that I have moved up from the status of a novice.  Last summer I decided that I wanted to add to my skills (and tools) and so I asked my husband for a serger for my birthday.  That serger has sat in the closet until recently when I finally got up the nerve to give it a whirl.

I decided that cloth wipes were a good place to start since they are very simple.  We have decided to give cloth diapering a try at least part time so it only seemed natural that we use cloth wipes when cloth diapering.  Joann Fabrics had a sale on their flannel prints not too long ago for $2.80 a yard.  I bought a half yard each of 5 different prints.
I pre-washed the flannel and then I used my rotary cutter and mat to cut 8 1/4" by 8 1/4" squares.  2 and a half yards yielded 40 wipes.  There are tutorials out there where people made double layered wipes but I didn't find that necessary.

My perfectly cut squares sat for quite awhile because the serger was still intimidating me.  I finally got up the nerve to thread the thing and then used a scrap piece of fabric to test it out.  The test run didn't go so well so I had to walk away from the serger again with a little bit of frustration.  A few days later I came back to it and discovered that I had made a few errors in the threading process. Once I fixed it, the machine worked like a dream.  I got to work serging the edges of my wipes.  I don't think that I would of been successful with this project if it weren't for the plethora of blog posts on serger tips, so thank you internet!

It took me no time at all to blast through that pile of 40 wipes.  I am pretty pleased with my first serger project.  The next one that I have in mind looks a little more complicated so I think I will have to work up some nerve again before I tackle that one!  I hope to be back later this week with a post on more art for the nursery wall.

Tuesday, May 5, 2015

It's A Girl Cookie Mix

Hello!  I am here with a quick post tonight.  I intended on having one more post in April but that depended on me figuring out how to use my serger and, well, I am still working on that.  Hopefully I will get it soon!

Today's post is another gift post.  I just love making gifts especially when it involves my Silhouette. This past weekend three of my awesome friends threw me a baby shower.  They were the best hostesses a girl could ask for because I didn't have do a single thing and the shower was so amazing. The food was delicious, the games were fun, and the decorations were so cute.  I am so thankful to have such wonderful friends.

To thank them for their hard work I decided to make some hostess gifts.  I love it when people give me mixes in a jar so I started by making some cookie mixes in quart size jars.
Nestle Tollhouse is selling fun springtime chocolate chips right now that have semi sweet chocolate chips with pink and yellow chips.  To make the mix you need to layer the ingredients into your quart size jar in the following order:

  • 1 and 1/3 cups of flour
  • 1 tsp baking powder
  • 1 tsp baking soda
  • 1/4 tsp salt
  • 1 cup cooking oats
  • 1 and 1/4 cups chocolate chips (you could also add m and m's)
  • 1/2 cup brown sugar packed
  • 1/2 cup granulated sugar
I made sure to pack all the ingredients after putting them in the jar so that everything would fit.
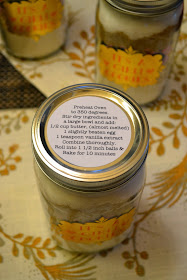
I used the print and cut feature on my Silhouette to make labels using the printable gold foil.
Next I printed the baking directions on white sticker paper and cut them to the size of the top of the jar with the Silhouette and then I stuck them on the tops of the jars.  Here are the baking directions:

  • Preheat the oven to 350 degrees
  • Stir dry ingredients in a large bowl
  • Add 1/2 cup of butter (almost melted), 1 slightly beaten egg, 1 tsp vanilla extract
  • Combine thoroughly
  • Roll into 1/2 inch balls
  • Bake for 10 minutes

Finally I cut some squares of fabric from my scrap supply with pinking sheers and used a rubber band to secure the fabric to the top of the jar.  Then I tied pieces of baker's twine over the rubber band.
I also gave each hostess a gift card to a local self serve yogurt place.  I made the gift card holders with kraft paper and the print and cut feature on the Silhouette.
You may notice that there are 4 jars.  One of my hostesses had a cousin that helped out a lot with the shower and I wanted to thank her too.  It was so wonderful of her to help!  Now the nursery is full of all of the great gifts that I got at the shower.  I feel so loved!  I will be back with another nursery post once I can get all of those wonderful gifts organized and put away.