Happy early Easter everyone! It is Good Friday and I am on off from work today. Unfortunately I have a nasty cold so I get to spend my 4 day weekend sick. Yay. But on the positive side this gives me time to write a blog post.
So if you haven't guessed it by now, I love my Silhouette Portrait. I bought it last July and have already done so many things with it. One of my recent projects was for a pregnant coworker. If you want to see more about how to create a project like this check out this post.
Now lets get to the real point of this post which also involved my Silhouette Portrait. Ever since I did my craft closet upgrade this project has been on my list. I have a growing collection of thread as I have been sewing for almost 2 years now and I wanted a way to store my thread that would also be attractive. I've had this corkboard for a long time now. When I lived in the dorms in college I covered it with shiny purple fabric and put pictures on it. I took the fabric off of it a few years ago and when I was looking for craft storage ideas on Pinterest and saw ideas for thread storage I knew that this was the new purpose for this corkboard.
I started by taping off the cork and then painted the frame with a paint sample that I had left over from when we were deciding what color to paint our bedroom. The color is Behr Smoked Oyster and it is a nice shade of greige.
Next I used my Silhouette to make a stencil from a transparency sheet. You can read more about this technique in this post on my dining chair redo. The shape is from the Silhouette Online store. I used a gold Martha Stewart craft paint that I had on hand and a foam brush to apply it. The gold blends in nicely with the cork so the pattern is subtle which I like.
I then took some nails and nailed them in at fairly even intervals. I have to admit that I was lazy and just eyeballed it so it isn't perfect.
I only covered half the board in nails which allows me space for 54 spools of thread. I have room to grow if I ever need it but I am doubtful that I will. The other side can be used for photos and memos. I also hung my fabric shears and pinking shears on the board.
I am in love with how this turned out but I am not in love with the purple walls in our office. Someday I will get around to painting them. One project at a time right!
Pages
▼
Friday, April 18, 2014
Saturday, April 12, 2014
Vintage Spring Table Decor
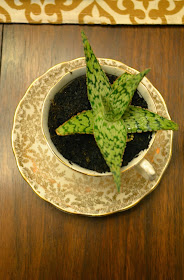
My two projects today are quite simple. First up: planting succulents in teacups. My dad collects antique oil cans so this summer on our annual road trip to Oklahoma we stopped at several antique stores on the way. I love vintage and antique things so it was fun for me as well. One of the things that I was on the lookout for on these antique trips were teacups. I found three that I really liked.
I love the minty green color at the bottom of this cup and in the middle of the saucer
I love the unique design of this one!
Originally, I wanted to make these cups into candles but my need to see some green after a long winter led me to the idea of planting succulents in them. Off I went to one of our local plant nursery, Baker Nursery to find some succulents and I found these three adorable guys.
I then filled the teacups partially with dirt, removed the succulents from their containers and shook the dirt off of the roots, then planted them in the cups and added a bit more dirt on the top.
Now unless you are brave and want to try to put a hole in the bottom of your teacup you have to be careful about watering these guys. There is no drainage so don't over water them.
Next up is a super simple project using my Silhouette Portrait, adhesive vinyl, wooden craft eggs, and a sharpie.
First I found some cute spring shapes in the Silhouette online store. Then I sized them down to a small enough size to fit my eggs. I drew a box around each shape. Then I set my Silhouette to vinyl and cut out my shapes.Then I weeded my designs and took the little stencils off of the backing and placed them on the eggs. I bought these eggs at Michaels last year. It took a little bit of patience to get the stencil where I wanted on the egg since it is a little hard to put it on a curved object.
Then I took a metallic gold sharpie and colored in my design.
I let the marker dry and then carefully peeled of the stencil. The nice thing about using vinyl is that it is reusable so you can make many of the same design if you want.
I bought a bird cage at Michaels awhile ago so I put some green grass that I had on hand in the bottom and placed my eggs inside.
I stacked some old books that I had on the table and placed the birdcage and teacups on them.
It feels so springlike in my dining room now! I just love it. The teacups with the succulents give the decor a whimsical feeling almost like Alice in Wonderland. I hope you like it!


