Saturday, April 20, 2013

Starting Seed Indoors

In hopes that spring is indeed coming to North Dakota eventually, today's post is about gardening.  Oddly enough, on Monday the school that I teach at had a 2 hour late start because of a snow storm on Sunday.  Yes it snows a lot in North Dakota but it is not a usual occurrence to get 10 inches of snow in mid-April.  I know that the Minnesotans are feeling our pain as well since many of my teacher friends in our neighbor state had 2 hour late starts or no school yesterday (the 19th of April!!).  We all have to believe that spring will indeed come and eventually summer as well.  With that in mind, I have started my vegetable plants indoors.

This is the 3rd year that I have done this and it has been quite successful.  My set-up is fairly inexpensive and anyone can do it. I have it set up in my basement.
The supplies necessary are:
  1. A wire shelving unit-the one I have is from Target-wait for a sale and you can get one for around $30
  2. 2 shop lights-about $25-30 a piece
  3. Bulbs for shop lights-you don't need special plant bulbs, I just use regular old fluorescent ones.
  4. A couple of s-hooks-really cheap at any hardware store
  5. 2 jiffy pot kits with plant warmers-They are usually about $35 a piece but I got the second one for $25 because it was on clearance.  The plant warmers are necessary for our cold unfinished basement but you may not need them if you are setting yours up in a heated area.
  6. A power strip for plugging in the lights and warmers


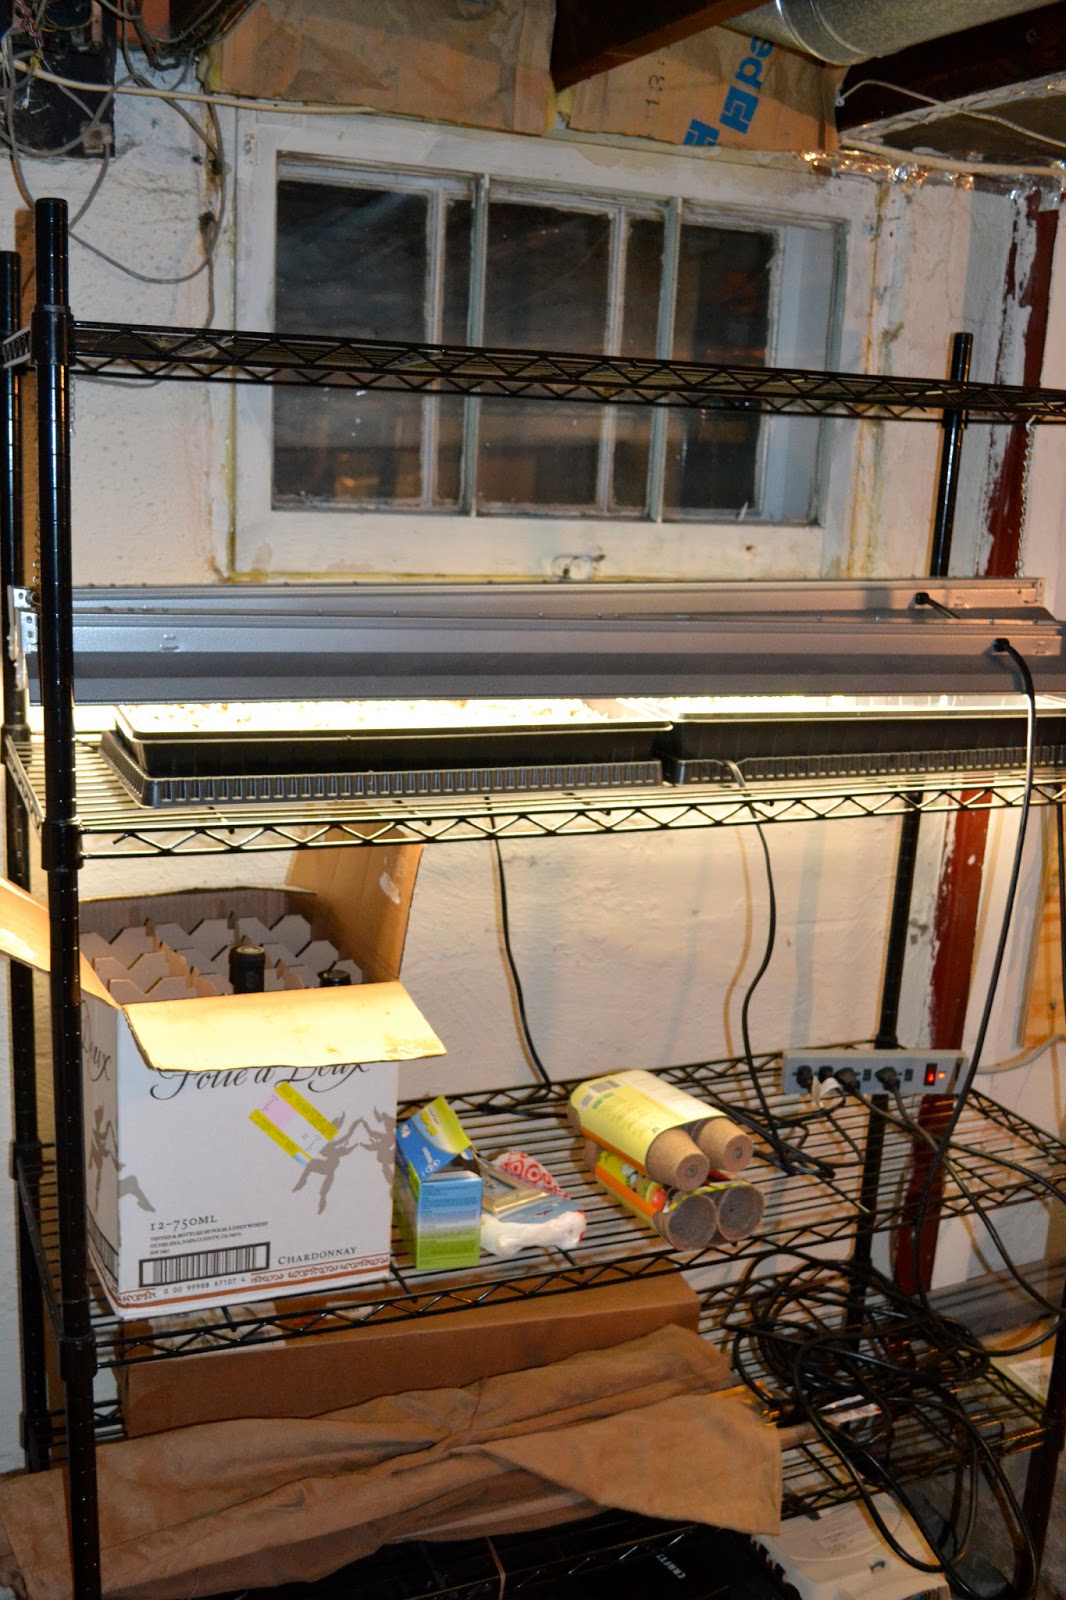
The s-hooks are essential because they allow you to adjust the shop lights.  You want them to be as close to the seedlings as possible without touching them.  For planting the seeds follow the instructions on the jiffy pot units and the seed packets to see how many weeks they need to be planted before moving outside.  I don't turn the lights on until I have a lot of seedlings popping up.  While the seeds are germinating I keep the lids on and then prop them open a little bit once the first seedlings start to appear.  Here is a look at my tomato seedlings.  Notice how low I have the lights.


Once the plants grow too large for the jiffy pots, I transplant them to larger pots.  Here are is a look at the various peppers and tomatoes from 2 years ago


My first year I only had one seed flat and no warmer.  I only grew perennials and herbs that year and the success was not great.  The black-eyed susans were a product of my first year of starting seeds indoors. 


When it is time to plant them outdoors, you need to expose them gradually.  This is called hardening them off.  I start by putting mine on the porch for a few hours, then eventually outside for parts of days.  The biggest adjustments for my little plants in North Dakota is the wind.  My second year I decided to grow tomatoes and peppers and since our rental house had hardly any yard, I decided to grow them in containers.  The first year they did really well and I had so many banana peppers that I ended up canning a banana pepper mustard (we still have 3 or 4 jars left).  Last year I had some problems with end rot on the tomatoes.  They also had to suffer the trauma of having their containers moved since we moved mid-summer last year.

This year I am excited to have a backyard and plan to plant them in a raised vegetable garden.  The peppers will be planted in the containers still.  I also decided to grow squash, green beans, and cucumbers this year.  I cannot wait to get outside and start gardening.  Come on North Dakota, bring me some spring!

Wednesday, April 3, 2013

Watercolor Painting Fabric


Wow, it has been a long time since I posted on this blog!  My entire life has been consumed by studying for my written comprehensive exam.  I was kind of a zombie for a while but little house projects did get completed when my brain couldn't take anymore.  The following picture shows how I have felt the past 6 weeks.

My biggest project lately was one that was started the day after the exam.  I have been having trouble finding fabric for the window treatment in the kitchen so I decided to make my own.  My inspiration was poppies which are some of my favorite flowers.


The supplies I used were Tulip soft fabric paint in several shades for mixing, cups and water, fabric markers, white cotton fabric, and a spray bottle full of water.

 The process was pretty simple.  I mixed the paints until I came up with an orangish reddish color.  Then I sprayed the fabric with the spray bottle so it was damp.  I also mixed a fair amount of water in to the paint.  This allowed the paint to bleed just like watercolor paint on paper.
 I covered the entire length of the fabric with flowers of random sizes.
Once the fabric dried I went in and added details with fabric markers.


Then I took the fabric and went through similar steps that I used in the making of the living room curtains.  I tore apart the roman shade that was originally there so that I could use the wood piece and brackets to mount this fabric.  I used safety pins to create the gathered effect.  I also sewed velcro onto the fabric and glued stapled velcro to the wood piece. 


I think it turned out nicely. Now on to a smattering of small projects that have been my brain restorers over the past month and a half.  First of all I finally got around to painting the door in the kitchen.  Goodbye mauve, hello tangerine cream!
I also purchased some curtain rods that I have had my eye on at my beloved Target for the dining room.  There was some frustration putting up the brackets, however so one window has one bracket only so far.  Plaster walls can be tricky sometimes but I still love old houses.  I am pretty awesome at wall repair though so you can't even tell anything happened and once I buy some more anchors I will attempt to mount the other bracket again.  I'm also excited because the fabric for the dining room curtains arrived yesterday so I can get started on that soon.

This sad little curtain rod wants a home;)
I also hosted Easter dinner for my family and it was a success.  I forgot to take a picture of most of the lovely food but here is the delicious dessert.

Next up, I will be posting about a starting seeds indoors in hopes that spring will soon come to North Dakota! 


Monday, February 25, 2013

Recipe Art + Kitchen Updates and a DIY Fail


So I have a very simple DIY art project for you today.  I wanted to put up some art on this faux brick wall and I wanted it to be personal and fit well with the kitchen.  So I chose some family recipes with some meaning and opened up Microsoft Word.  In word I created a text box and then changed the fill color.  I went with oranges and pinks because those are the colors I will be using to accent the grey in here.  Then I used a bunch of fonts to type up the recipes.  Many of the fonts I used are free downloaded ones that are available all over the internet and Pinterest.   Then I bought 4 simple white frames, trimmed the papers to fit, popped them in the frames, and hung the frames on the wall.  Piece of cake!

The recipes that I chose have a special meaning to me.  Catherine's Cream of Tomato Soup was a recipe from a restaurant that we used to go with my dad's parents.  The owners knew us well and would always come out and talk to us when we came.  This soup is hands down my favorite tomato soup.  The next recipe I chose is my Grandma Charlotte's chocolate cake.  This is the cake that I have had for many family birthdays and it is so good.  I chose Norwegian Meatballs because of all the Norwegian heritage in this part of the country.  The last recipe I chose was Cowboy Caviar.  It is a dip that we have had on New Years Eve for many years and it has black-eyed peas in it which are supposed to bring good luck for the new year.

You may have noticed one of the other kitchen updates already. Yep that faux brick wall is now grey.  Remember this before?
I am so pleased with the way it turned out even though it was a beast to paint with all that texture and all those crevices.  It looks so modern and lovely now.  I also painted the wall with the door and above the window. 


The rest of that "lovely" peachy area is going to covered with the tile from this post.  I also replaced the outlet covers with these guys:
 
They are from Target and they match the white ones that are in the living room, dining room, guest bedroom, and master bedroom.  For some reason Target didn't carry the other type of outlet plates in- store so I have to order those online for the other wall.

Now for the diy fail.  Ok so I use a lot of herbs and spices in my cooking and my current storage of them wasn't working for me.  They were all shoved in a cabinet all willy nilly and I would either go through every spice just to find the one that I needed or I would think I was out of one and go buy another one at the store only to find out that I already had three of that kind.  True story, really, at one time I had 5 containers of ground ginger!  Ridiculous!  So the plan was to make a cool magnetic spice rack so I bought the supplies and pulled all of my spices out of the cabinet.


As you can see I am now down to three containers of ginger.  Well the magnetic spice rack ended up being a bust.  I decided to go with ceramic magnets instead of rare earth because I was worried about the proximity of my microwave to the spice rack.  I glued the magnet on the first jar and tried it out on the sheet metal and it worked so I preceded to glue magnets on the top of the other 23 jars.  Then before mounting the metal sheet on the wall I tested some to see and as soon as a I put a second one on the first one fell off.  Fail.  

It was an easy fix though.  I ordered two wall-mounted spice racks from Amazon and I think they look pretty nice.  The plan is to spray paint them black when it is finally warmer outside, gotta love North Dakota. I also will put some labels on the jars.  I like the look of all the jars instead of those ugly plastic containers. 


Now the plan is to paint the door.  I have already purchased the paint, Valspar Tangerine Cream.  Then I will be making a faux roman shade for the window and eventually the tiling will get done.  I love how the kitchen is coming together so far!


Sunday, February 10, 2013

Function Over Form: The Bonus Room Transformation


When we were looking for houses we were looking for 3 bedrooms.  We were lucky enough to find the house that we are in now which has a bonus room in addition to the 3 bedrooms.  You could call it a potential 4th bedroom but there is no door to close it off that would make it a bedroom.  When we moved in, the room was a blank slate:
Overall, I don't plan on doing much "decorating" in this room.  I like the wall color because it is a nice subtle neutral and nicer than just plain white walls.  The window treatments were left by the previous owner and I like them for now because they are kind of funky.  The curtain rods are old golf clubs!  When we moved in, this room housed all the boxes that we didn't want to deal with unpacking yet but my husband and I had some big plans for the room.

We are both runners and we knew that someday we would like to own a treadmill.  I have a YMCA membership and John has a work-out facility at his work but training for marathons and half marathons requires hours on the treadmill in the winter and work-out facilities are often crowded in January and February.  Neither of us are brave enough to run outside in the North Dakota winter.  I don't mind the cold (partly because I love my cute cold weather running gear:) but the ice and snow makes me nervous about falling and injuring myself.  It is funny because the treadmill was one of our down-the-line big purchases.  But when we got to thinking about it, it is something that we really wanted and so we took the plunge.

And it was definitely a plunge because runners need a good treadmill and the cost runs high for a quality one.  We do not regret the purchase at all because since we got it in December we have already put at least 100 miles on it.
We also have a very nice exercise bike that John purchased when he lived in his last apartment.  I bought John a bluray player for Christmas and then we used part of John's Christmas bonus to buy a nice HD TV which we wall-mounted.  The bluray player is nice for working out because it has built in wi-fi so we can watch Netflix, listen to Pandora, or stream work-out videos from YouTube.  I can also watch my Pilates and Jillian Michaels videos for my strength and cross training days.

My futon also found a home down here so that we can watch movies and enjoy TV.  It is the only TV in the house that gets PBS so I watch Downton Abbey down here (we don't have cable, only antenna).  It can also double as an extra guest room with the futon.  My futon has a nice mattress with springs in it so it is actually pretty comfortable.

I plan on making some inspirational word art for the walls down here since the room's main function is as an exercise room.  Today we added some medal hangers to the walls so that we can display the medals that we get from races.  We got these medal hangers at the Fargo Marathon expo last year from a local vendor.  They are pretty cute and I can't wait to fill it full of medals.  I will have 3 more by the July as I am running the Get Lucky 7K in Minneapolis next month, the Mickelson Trail Half Marathon in Deadwood South Dakota in the beginning of June, and the Run or Dye 5K in Fargo at the end of June.  No Fargo Marathon events for me this year though because I am bridesmaid in my friend's wedding which is on marathon weekend.

Sunday, January 27, 2013

50 Shades of Grey


Okay so this blog post has nothing to do with the recent obsession of women with that book series 50 Shades of Grey.  In fact I have never read any of the books and don't plan on doing so ever.  But I do have to confess a big obsession of mine...my obsession with the COLOR grey.  I just cannot get enough of it.  It is the perfect neutral.  It can be cool, it can be warm, it can have undertones of pretty much every color.  It makes brightly colored decor pop.  So naturally this obsession has shown up in my house frequently.

My dining room is painted with a moody grey called City Storm by Valspar.  It makes my dining look elegant and modern.  Just this week, I purchased a tile for my kitchen back splash that is of course grey.  I think it will look awesome with a white grout and the pattern ties in nicely with the stencil pattern on the dining room walls.
I picked out a beautiful grey with green undertones for our bedroom called Washboard by Ralph Lauren.

And I have just finished painting the guest bed room a beautiful warm grey called Sparrow from Behr.  I think it looks beautiful with the Tiffany blue damask bedspread I have on the guest bed.  Now I just need some more furniture for the room because currently it is very bare.


Phew...I feel so much better now that I have made that confession to all of you.  It isn't a bad thing to be obsessed with right?;)

Saturday, December 22, 2012

Fa la la Food!


Another thing I love about Christmas time is baking.  I love to experiment and make new things.  I also like to bake for my students.  My 4th and 5th grade choir sang You're a Mean One Mr. Grinch this year, so when I saw these cute Grinch cookies on Pinterest, I had to make them.  I got the recipe from this blog.  Here is the recipe:

Grinch Cookies

  • 1 18.25 oz box French vanilla cake mix (I just used white cake mix)
  • 6 T butter
  • 2 eggs
  • Green food coloring
  • 1 c. powdered sugar
  • 1 t corn starch
Directions:
Preheat the oven to 375°. Melt the butter and set aside to cool. In a shallow dish, mix together the powdered sugar and cornstarch with a fork. In a large bowl, mix together the cooled butter, cake mix and eggs. This will be a little hard to stir together. Add the green food coloring and make sure it is all mixed in.

Take two spoons and drop a blob of dough in the powdered sugar. Move it around with spoon until it is mostly covered in powdered sugar. Then, once it is already covered, roll it into a ball and place it on a cookie sheet.

Make sure you don't over crowd the baking sheet because these cookies spread out.

Bake them for 8-9 minutes.   They will look slightly puffed up.

Take them out of the oven and cool for one minute. Then move onto a cooling rack. They will drop a little, but will still be nice and chewy.


I also made a batch using red velvet cake mix for my piano studio's recital but I forgot to take a picture.  They tasted awesome!  My husband took the leftovers to work the next day and they got rave reviews from his coworkers.


 I also made cake pops for my piano studio's recital.  I have never wanted to make these before because the traditional method of making them uses frosting to hold together crumbled up cake.  I do not like most kinds of frosting so these didn't sound appetizing.  Lately, several companies have made devices and pans for making these by just baking cake in a round shape.  I used the Nordicware cake pop pan that I purchased it at Target for mine.
I used the recipe on the package.  The recipe created brownie like cake that was very dense and rich.  Here it is:
Fudgy Cake Pops

  •   3/4 cup semi-sweet chocolate chips
  • 1/2 cup butter
  • 3/4 cup sugar
  • 3 Tbsp cocoa
  • 2 eggs
  • 3/4 cup flour
  • 1/4 tsp salt
  • 24 lollipop sticks
  • 1 package chocolate bark coating (I also used regular white almond bark)
  • assorted sprinkles (I used colored sugar) 
Heat oven to 325 degrees.  Grease pan and set aside.  In medium saucepan, over low heat, melt chocolate chips and butter together; stir until smooth.  Remove from heat and pour into medium bowl.  Add sugar and cocoa; mix until blended.  Add eggs, one at a time, mixing well after each addition.  Add flour and salt; stir until blended.  Spoon batter into bottom half of pan (without holes) filling each well so it mounds over the top of the pan.  Place top half of pan on top and secure with keys.  Bake for 20-25 minutes, until toothpick inserted comes out almost clean.  Cool 5 minutes in pan, remove cake pops from pan to cool completely.  Melt chocolate bark according to package directions.  Insert lollipop sticks into cakes.  Dip cake pops in melted chocolate, spinning to let excess chocolate rip off.  Decorate with sprinkles as desired.  Place on parchment paper to set.  Makes about 24 cake pops.

I also decorated some by dipping them in the white almond bark and then drizzling some of the chocolate bark over it.  I let them dry by sticking the stick end into a block of floral foam.  I displayed them at the piano recital in some parfait glasses that I picked up at a thrift store.  The sticks were shorter than I thought so I filled the parfait glasses with some coffee beans then stuck the pops in.  They turned out so cute and they were a big hit with my piano students and their siblings.


Related Posts Plugin for WordPress, Blogger...