Pages

Monday, September 16, 2013

Nightstand Makeover

My new room of focus lately is our bedroom.  I can't wait to paint the walls in there because I am tired of staring at these paint swatches:
 I will be painting one wall at a time as I am simultaneously working on making over some of the furniture pieces in the room.  I decided to start with the nightstands.  Very few pieces of furniture in our house are new, most are a variety of thrifted, consignment, or hand-me-down items.  When we moved into this house we had to find nightstands.  In our rental house there was only one little nook that could fit our queen bed so we had no room on the sides for nightstands.  I found this lovely pair of nightstands at a consignment furniture store for $20 a piece.  They weren't much to look at but they are mostly solid wood and I like the shape and size of them. We have been using them as is for over a year now and they are great functionally but it was time for a change in appearance.
I decided to paint them since I am also planning on redoing an armoire and a dresser which are both laminate.  I chose a nice dark brown, Valspar Brown Velvet, and bought a gallon in satin finish.  I also decided to do a fun stencil pattern in that faux leather square in the middle of the top.  I started by sanding it down with my new handy dandy palm sander.
After sanding, I cleaned it off and then I primed it with Zinsser 123 Bullseye primer.  I like that primer because it is thick and sticks well to many materials.
Then I painted two coats of the Valspar Brown Velvet on all of the nightstand except the part where I would be painting the stencil pattern.
I chose two Folk Art acrylic craft paints for the stencil design on the top: metallic taupe and french vanilla.  I covered the whole area with the french vanilla.
I bought this geometric pattern stencil at Michaels.  Then I stenciled using a foam brush and the metallic taupe paint.
I found this drawer knob at Hobby Lobby. 
Here are the finished nightstands in the bedroom. It is definitely a huge improvement.  I love the classy and unique look of them now and it makes me even more excited to paint the walls and trim in this room.
Next up on the bedroom list is redoing my armoire and painting the wall and trim next to my closet.

Tuesday, September 10, 2013

Creating Custom Fabric Labels with the Silhouette

My latest Silhouette project was one that left me banging my head against a wall for a while.  When I found out the Silhouette was able to sketch designs and I found out about gel pens made for writing on fabric, I knew that I had to make some cute custom labels for my sewing projects.

I bought all my supplies for this project and was ready to get sketching:
1. fabric-I bought half a yard of twill fabric at Hobby Lobby because I wanted the labels to have a little weight and texture to them.
2. Iron on adhesive-I used Heat'n Bond in the red pack.  The purple pack can be used if you want to stitch around your labels.
3. Fabric gel pens-I bought mine in a two pack at Hobby Lobby in the aisle with the fabric paints.
4. Silhouette pen adapter

I started by designing my label in the Silhouette software.  My first design used one of my free downloaded fonts and a bird in a birdcage image.  This was a problem but we'll get to that later.  I started by cutting the iron on adhesive to the size of the work area on the cutting mat.  Then I ironed it to the fabric following the directions on the fabric and cut out the piece with the adhesive and placed it on the cutting mat.
Then I loaded the mat into the Silhouette, hit the send to Silhouette button in the software making sure to select sketch pen instead of blade and hit cut.  This is where the problems started.  The program would stop for a really long time as if it was frozen and then the program would crash.  This made me very frustrated.  I finally figured out that I had to use designs and fonts that were specifically labeled as sketch designs and fonts in the Silhouette store.

So I found a few of these in the Silhouette online store, downloaded them and redesigned my labels.  In the meantime my gel pen leaked all over a corner of my fabric, ugh.
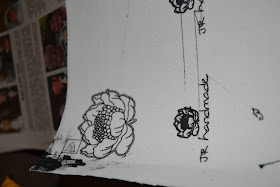
Lovely, right?  Then I started sketching the new labels and the pen was leaving lines as it moved across the fabric to sketch the next label.

I figure out that the nib of the pen was too far down in the holder so I adjusted it and was finally able to get some labels successfully printed.

Despite all the headaches that this project gave me, I am really ecstatic with the results.  I just made another set of burp cloths and the labels look fantastic on them.

Hopefully if you are trying to do a project similar to this, this blog post will save you from making the same mistakes that I did! 

Friday, September 6, 2013

Ruffle Wreath


I am finally back after a long break!  The school year started up three weeks ago and I have been occupied with many creative projects in my classroom instead of at home.  I have also been out of town the past two weekends so that has made it hard to do projects at home as well.

This ruffle wreath is a project that I have been meaning to tackle for a while.  I pinned this post on Pinterest in July.  I bought the materials for it in early August.  I finally got around to making it this past Tuesday.  Use the link above to find the tutorial because I did not take any pictures of the process.  It is super easy to make and took me about 45 minutes to complete (most of that time was spent cutting the fabric).  The fabric is Premier Prints print from fabric.com and I got the straw wreath from Joanns.  I love how bright and fun it is.

I think that I might adjust it so that it hangs a little higher on the door and I did adjust it later so that the ruffles are more towards the bottom.  This picture reminds me that I still need to get on painting that woodwork around the door white.

I also wanted to share the new furniture addition on the porch.
The best thing about this cedar chest is that it was a free hand-me-down from my father-in-law.  I love that it still has the tag on it.  I think I will keep it just as it is because I love it.  I plan on storing blankets in it for the cold months coming up and putting my antique bottle collection on it.